Customer App Documentation
Welcome to the Skedisy Customer App documentation. This comprehensive guide will walk you through every feature and functionality of the customer application, helping you make the most of your booking experience.
Table of Contents - Customer App
Looking for Expert App documentation? Click here to jump to the Expert App section.
Home Screen
The Home Screen is your main entry point to the Skedisy app. It provides quick access to service categories, nearby salons, and search functionality.
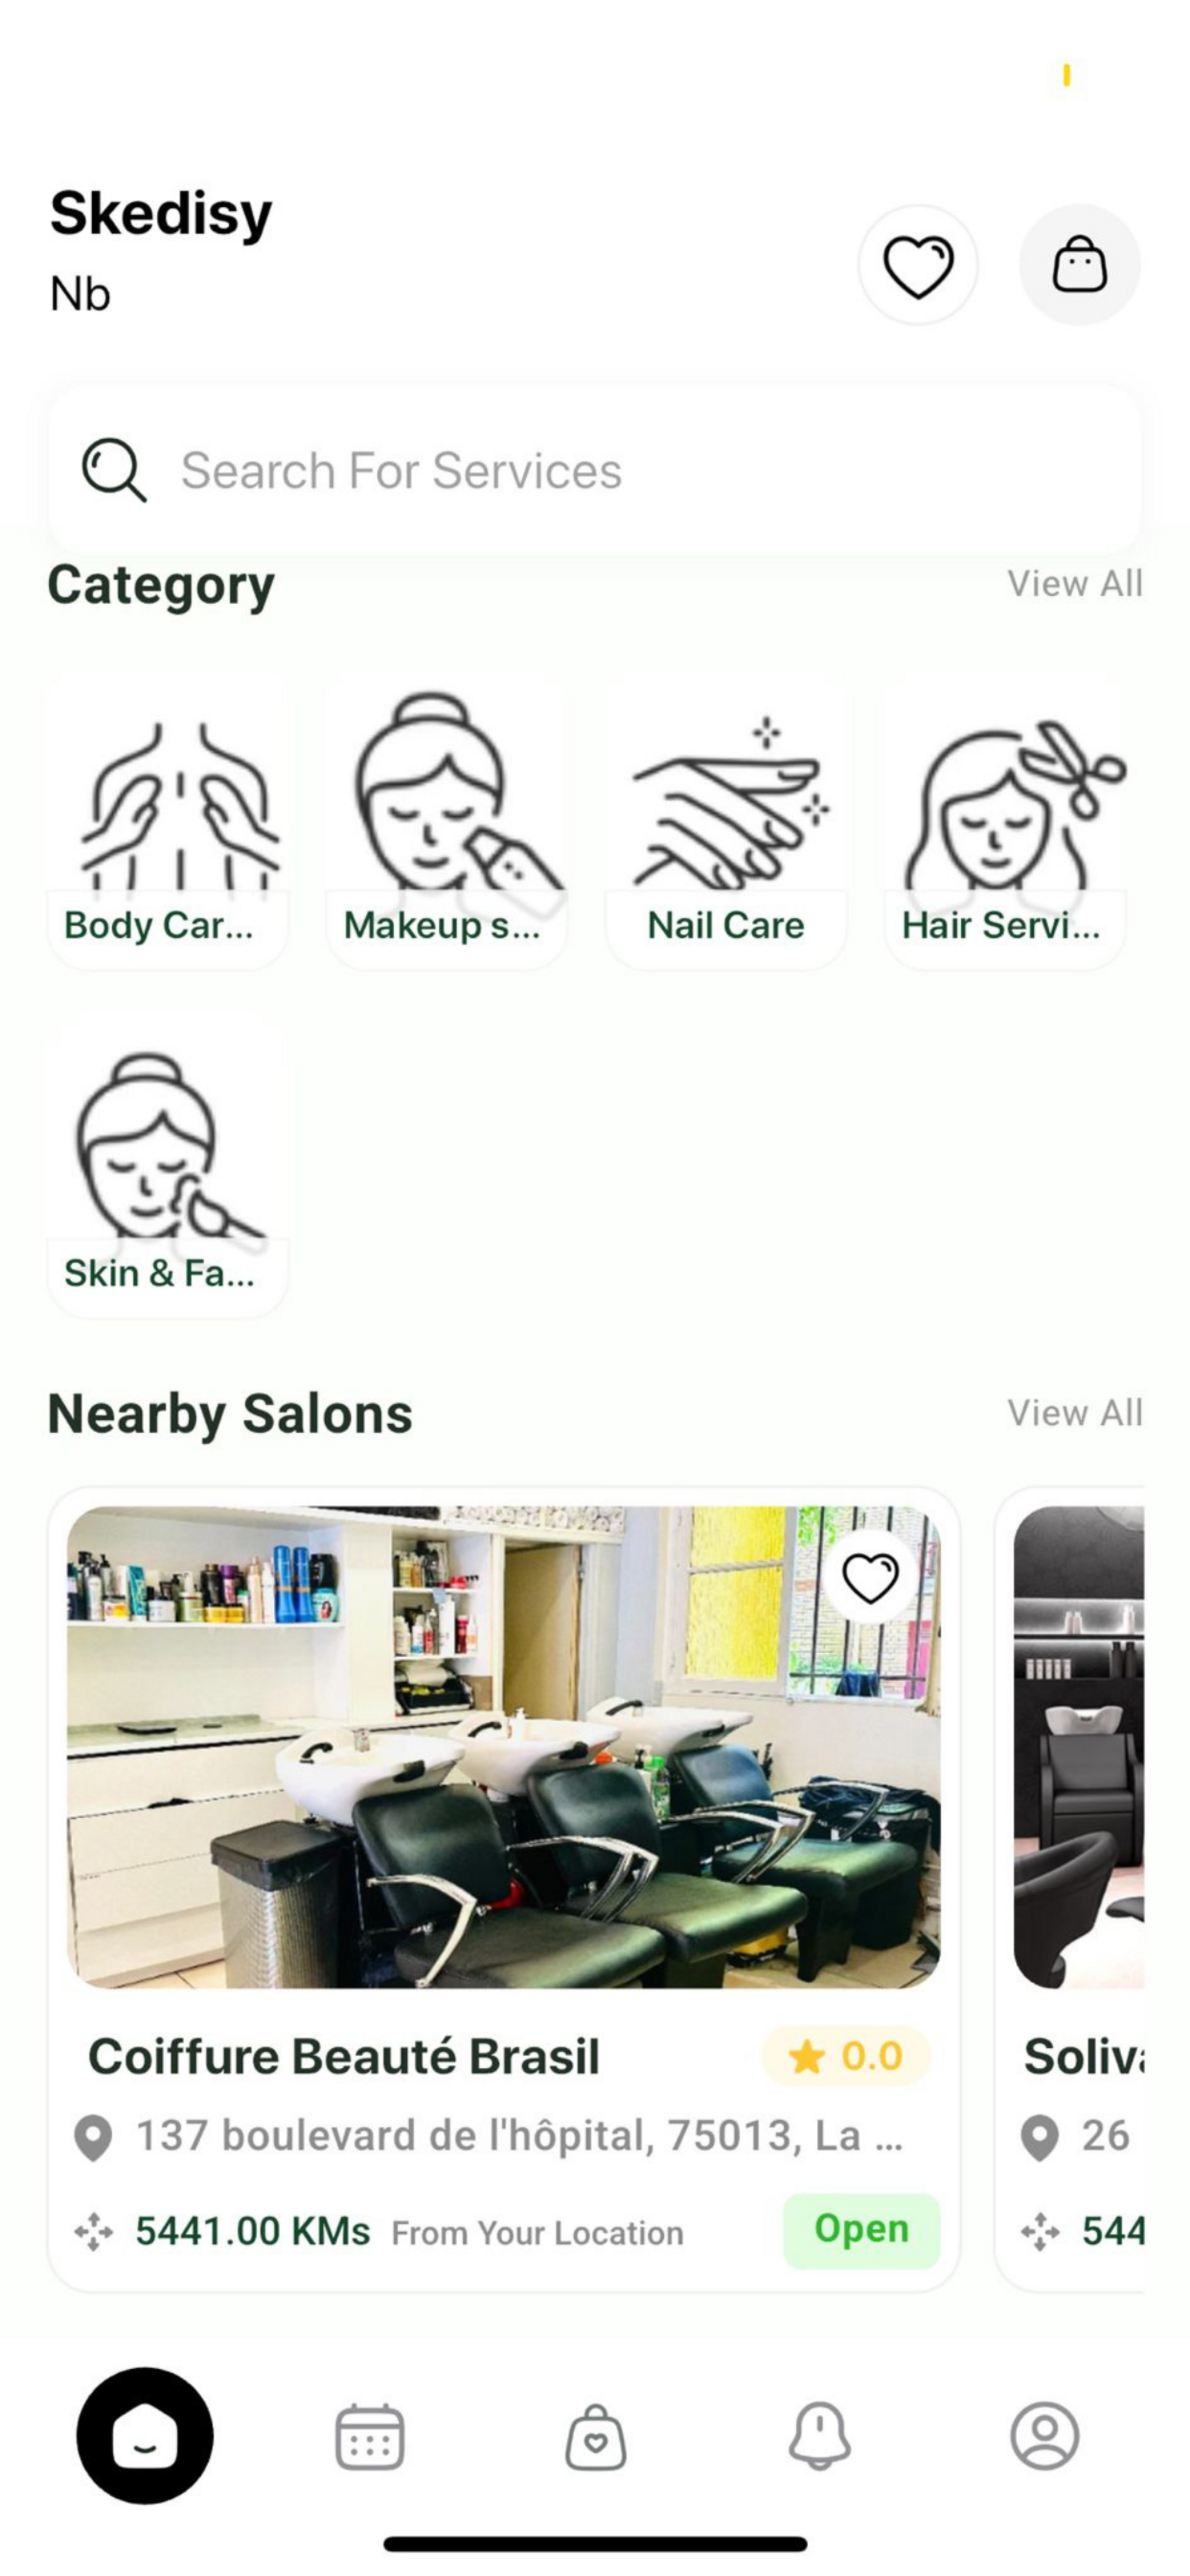
Header Section
1Brand Name & Location
The top left displays the "Skedisy" brand name with your location indicator (e.g., "Nb" for your current area).
2Action Icons
On the top right, you'll find two outline icons:
- Heart Icon: Access your favorites and saved salons
- Shopping Bag Icon: View your cart or current bookings
3Search Bar
The prominent search bar allows you to quickly find services by typing keywords. Simply tap the search bar and enter what you're looking for (e.g., "haircut", "manicure", "facial").
Category Section
Below the search bar, you'll find a horizontal scrollable list of service categories. Each category is represented by:
- Icon: Visual representation of the service type
- Label: Category name (e.g., "Body Care", "Makeup Services", "Nail Care", "Hair Services", "Skin & Facial")
Tap on any category to view available services in that category. You can also tap "View All" to see all categories at once.
Nearby Salons Section
The "Nearby Salons" section displays salons in your area, sorted by proximity. Each salon card shows:
- Salon Image: Visual preview of the salon interior
- Salon Name: The business name (e.g., "Coiffure Beauté Brasil")
- Rating: Star rating and review score
- Location: Full address with map pin icon
- Distance: Distance from your current location in kilometers
- Status: Open/Closed indicator with color-coded button
- Favorite Icon: Heart icon to save the salon to your favorites
4Viewing Salon Details
Tap on any salon card to view detailed information, including:
- Complete service offerings
- Available time slots
- Expert profiles
- Pricing information
- Customer reviews
Bottom Navigation
The bottom navigation bar provides quick access to the main sections of the app:
- Home (House Icon): Return to the home screen
- Calendar: View your appointments and bookings
- Shopping Bag: Access your cart and bookings
- Bell: View notifications
- Profile: Access your account settings and wallet
Booking Process
The booking process in Skedisy is a streamlined, step-by-step journey that guides you through selecting a salon, service, expert, date, time, and payment method. This section covers the complete booking workflow from start to finish.
Booking Steps
Booking Process Overview
The booking process consists of four main steps, clearly indicated at the top of each booking screen:
- Venue - Choose service location (At Salon or At Home)
- Personnel - Select your preferred expert
- Date et heure - Pick date and time slot
- Paiement - Select payment method and confirm
Each completed step shows a checkmark, and the current step is highlighted.
Two Ways to Start Booking
You can initiate a booking in two different ways:
Option 1Book Through Expert
Start your booking by selecting a specific expert directly from the menu. This option allows you to choose your preferred service provider first, then select the service and salon.
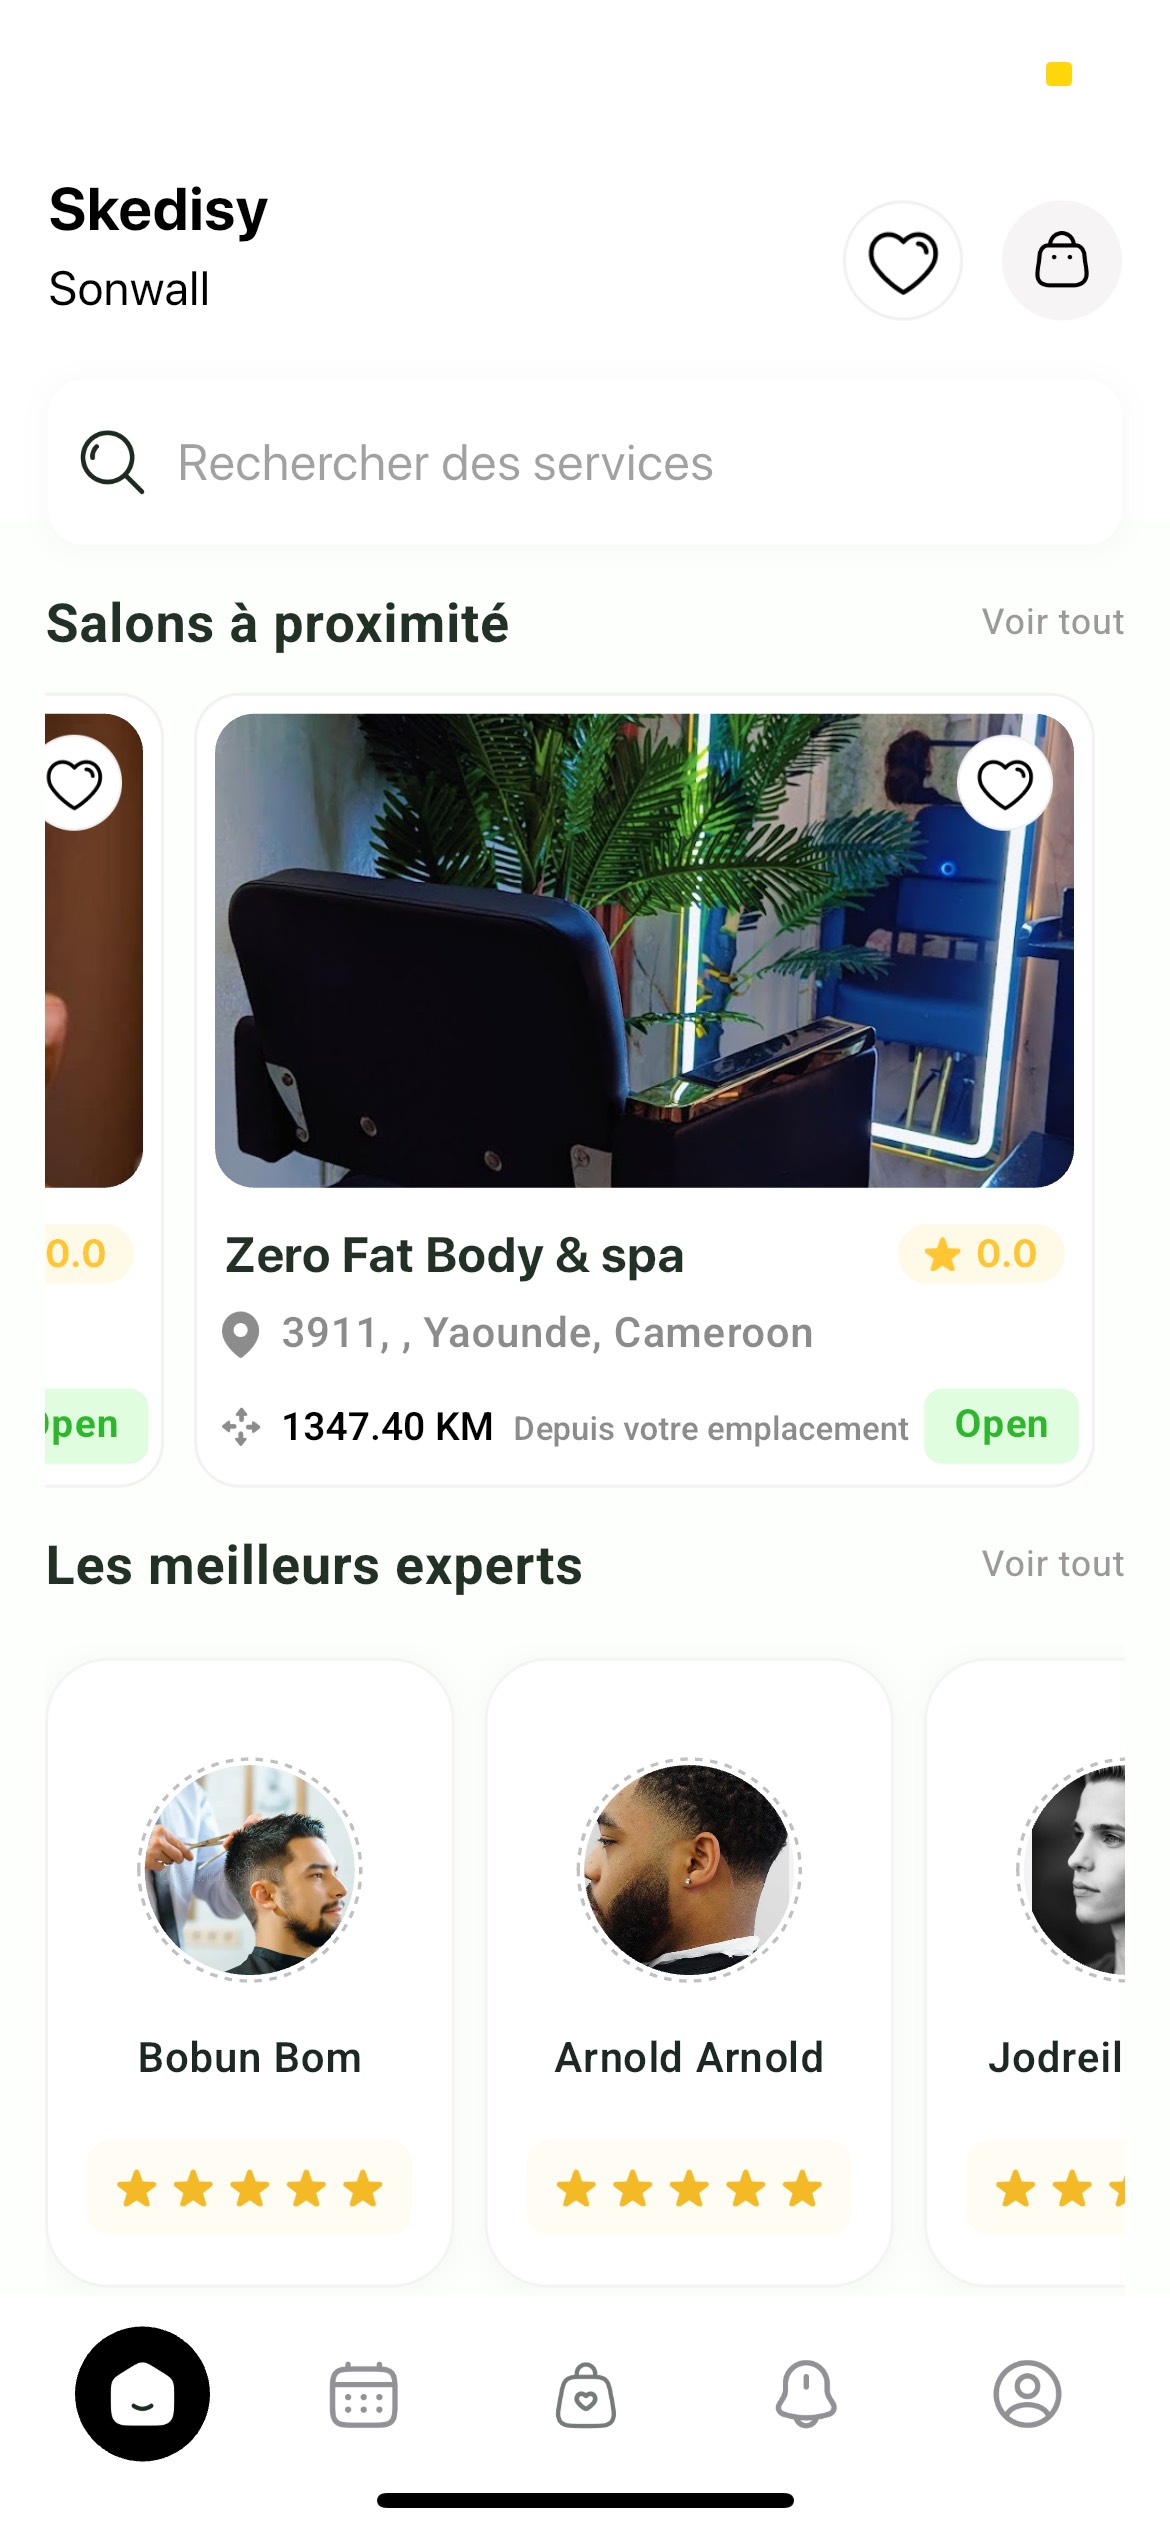
When you choose to book through an expert:
- You'll see a list of available experts
- Each expert card displays their profile, ratings, and specialties
- Tap on an expert to view their available services
- Select the service you want and proceed with the booking
- The expert's associated salon will be automatically selected
Option 2Book Through Salon
Start your booking by selecting a salon first. This is the traditional method where you choose a salon, then select services and experts available at that salon.
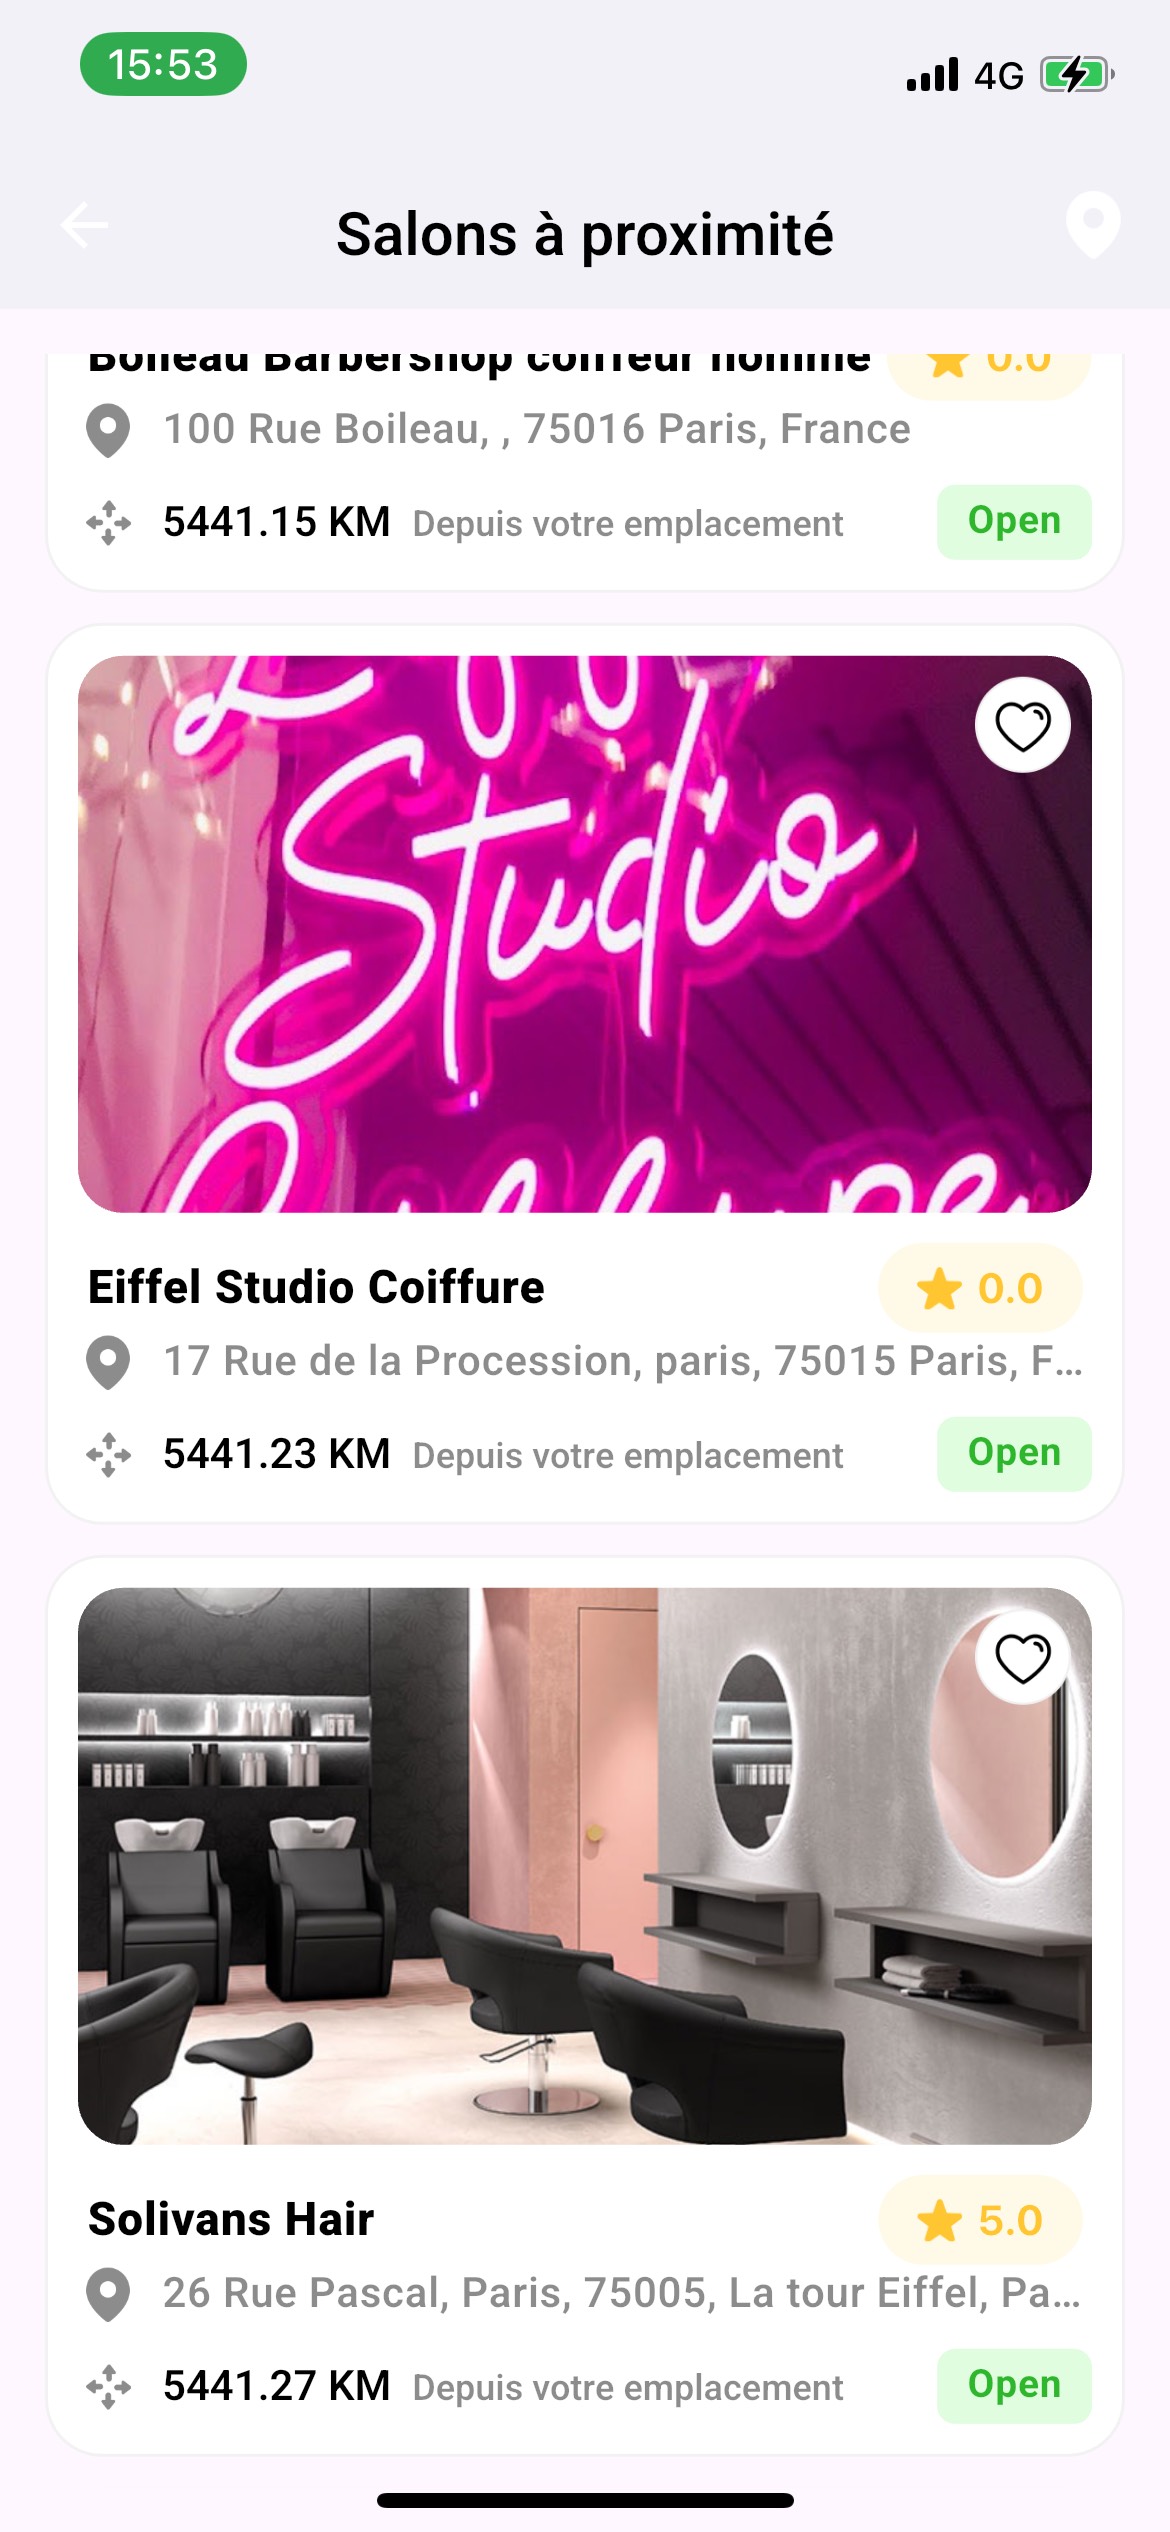
Step 1: Select Salon
If you chose to book through a salon, begin your booking by choosing a salon from the available options. The salon selection screen is shown in the "Book Through Salon" option above.
1Salon Listings
The "Sélectionnez le salon" (Select the salon) screen displays available salons with:
- Salon Image: Visual preview of the salon interior
- Salon Name: Business name (e.g., "Solivans Hair", "Prestige Paris")
- Rating: Star rating (e.g., "5.0") displayed with a gold star icon
- Address: Full location with map pin icon
- Distance: Distance from your location (e.g., "5441.15 KM Depuis votre emplacement")
2Viewing Salon Details
Tap on any salon card to view detailed information, including:
- Complete service offerings
- Service prices and durations
- Available experts/staff
- Customer reviews
- Contact information
- Directions and calling options
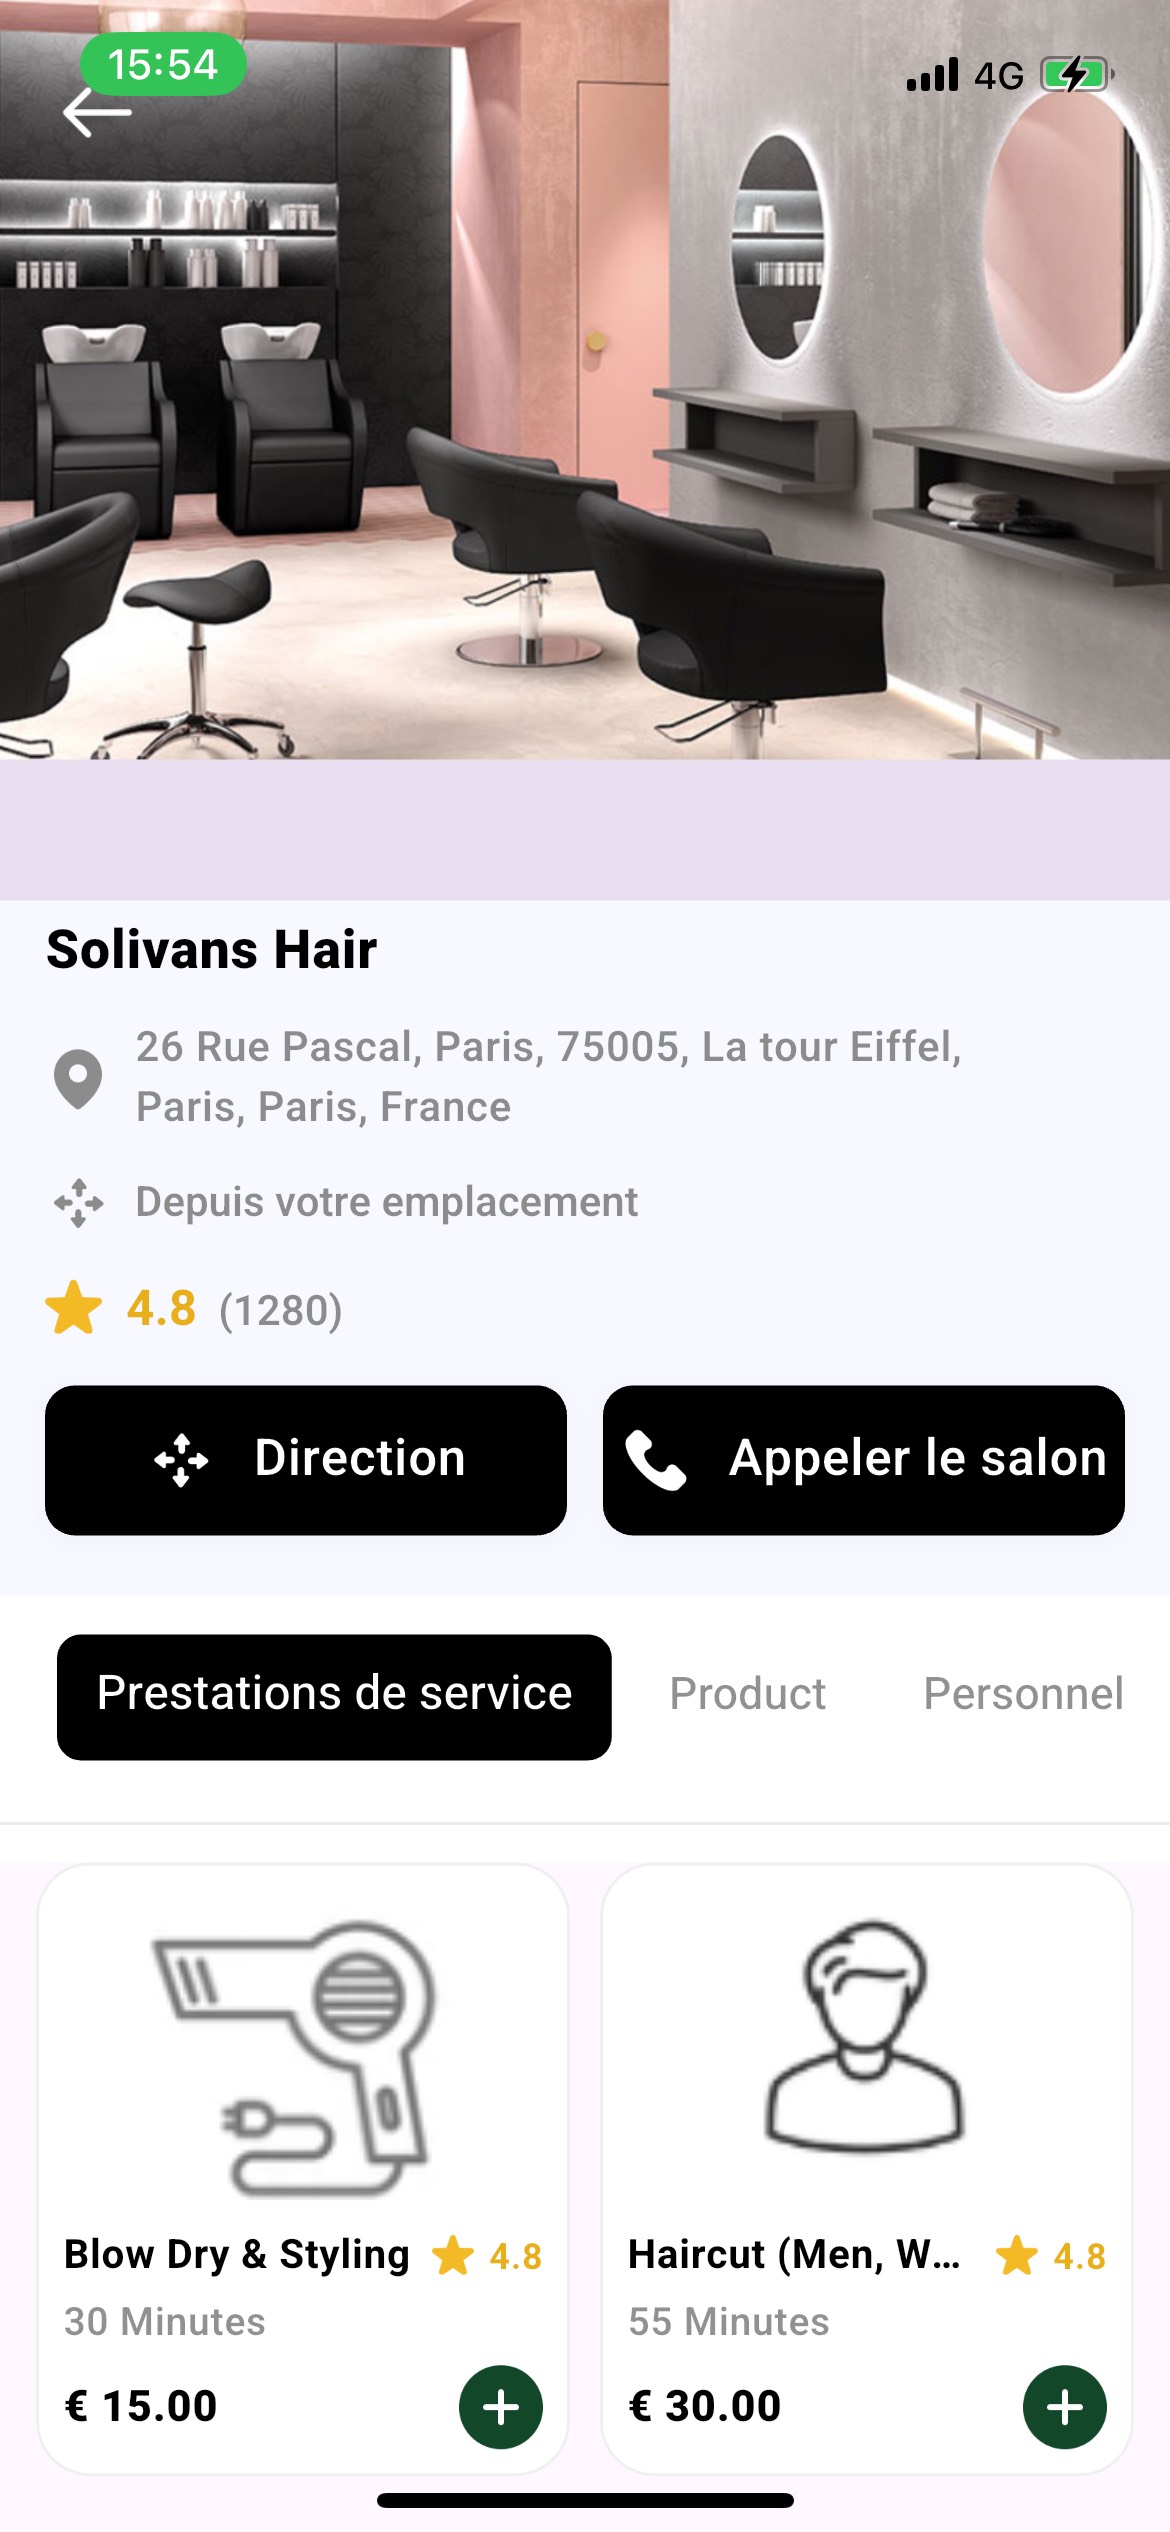
3Salon Detail Page
On the salon detail page, you'll find:
- Salon Image: Large interior photo at the top
- Salon Information: Name, address, rating, and review count
- Action Buttons: "Direction" (Directions) and "Appeler le salon" (Call the salon)
- Service Tabs: "Prestations de service" (Services), "Product", and "Personnel" (Staff)
- Service Cards: Each service shows:
- Service icon
- Service name
- Rating
- Duration (e.g., "30 Minutes", "55 Minutes")
- Price (e.g., "€ 15.00", "€ 30.00")
- Add button (green circle with plus sign)
4Selecting a Service
To start booking:
- Browse the services in the "Prestations de service" tab
- Tap the green plus button on the service you want
- The service will be added to your booking
- You'll proceed to the booking process
Step 2: Choose Service Venue
Select where you want to receive the service - at the salon or at your home.
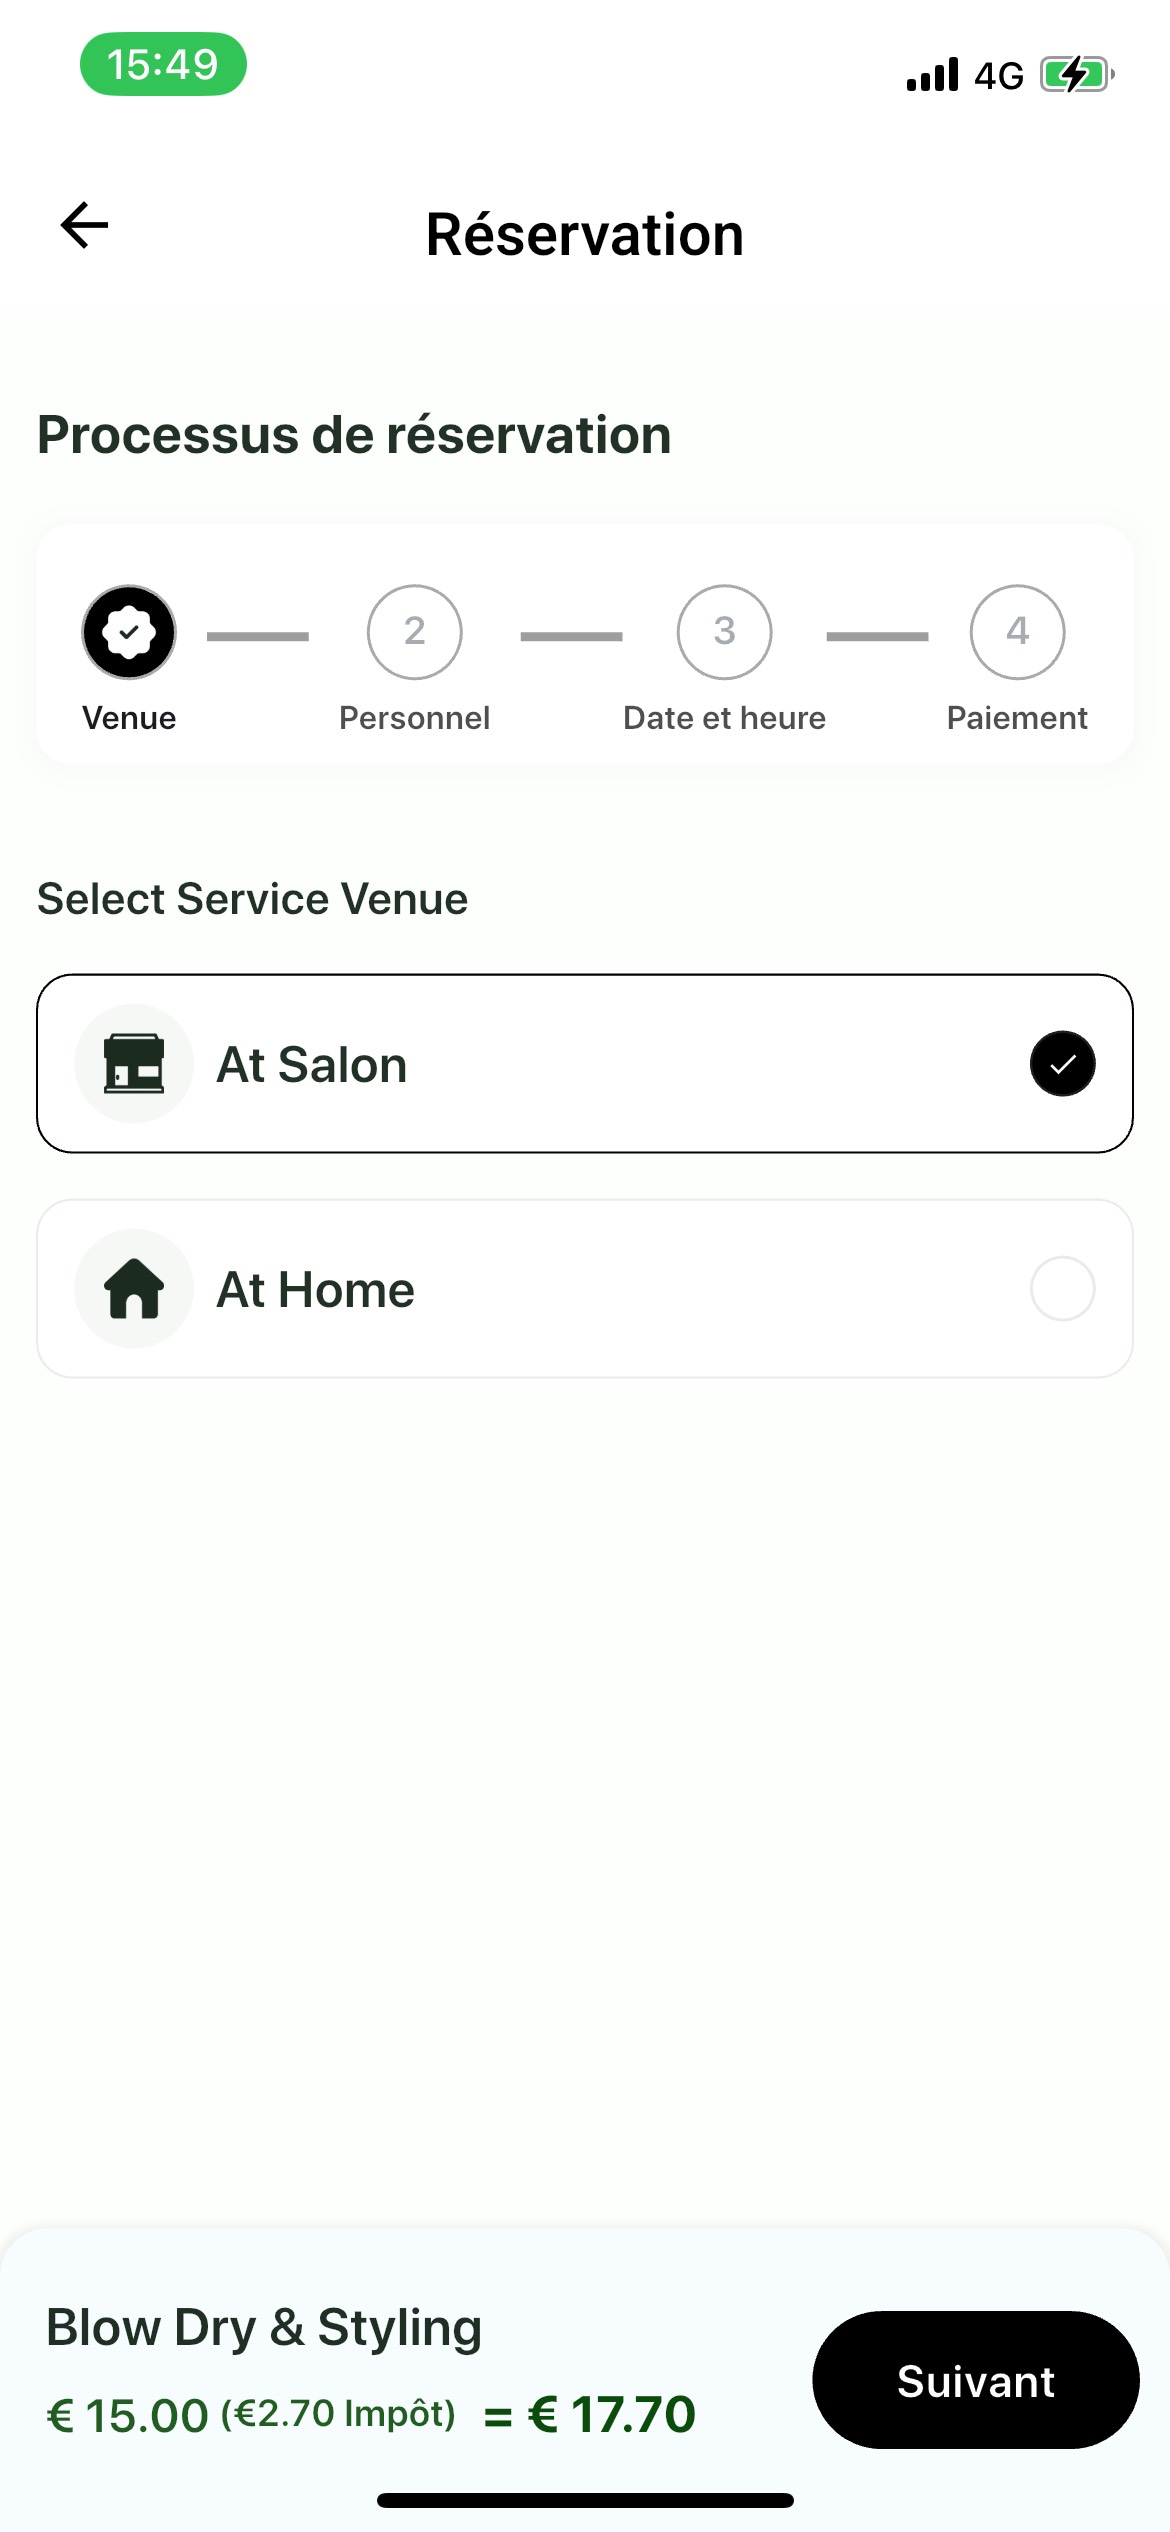
1Venue Options
The "Select Service Venue" screen offers two options:
- "At Salon": Service will be performed at the salon location
- Shows a building/shop icon
- Selected with a black circle and white checkmark
- "At Home": Service will be performed at your location
- Shows a house icon
- Unselected shows an empty grey circle
2Making Your Selection
Tap on your preferred option. The selected venue will be highlighted with a checkmark. Then tap "Suivant" (Next) to proceed.
Step 3: Select Expert
Choose your preferred expert or staff member to perform the service.
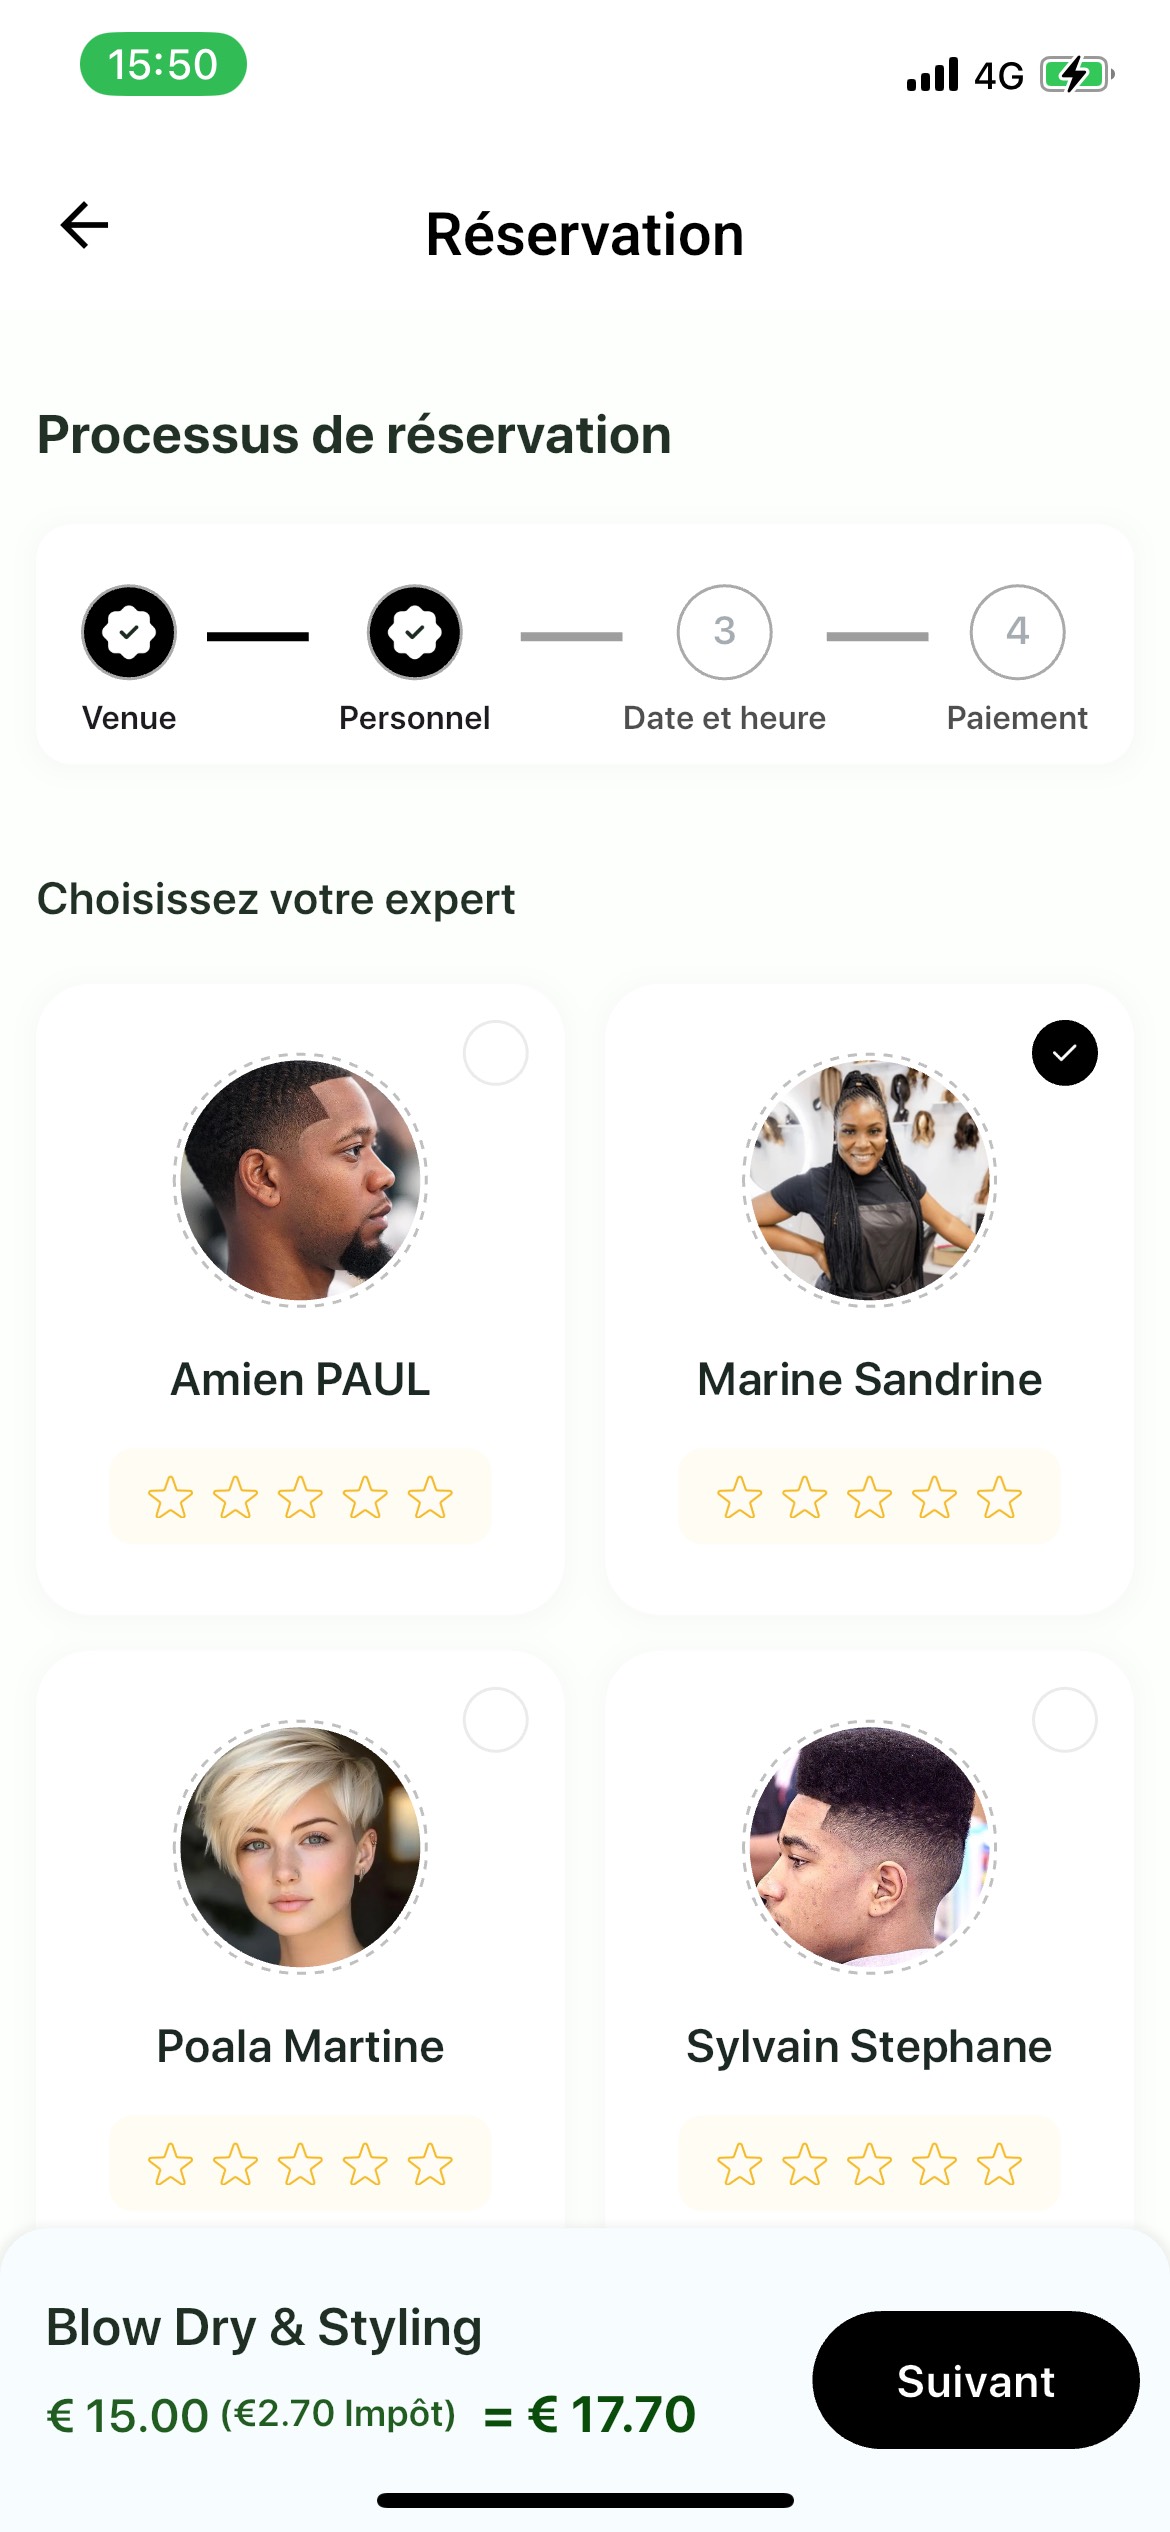
1Expert Grid
The "Choisissez votre expert" (Choose your expert) screen displays available experts in a grid layout:
- Profile Picture: Circular photo of each expert
- Expert Name: Full name displayed below the photo
- Rating: Star rating (if available)
- Selection Indicator: Radio button in the top right corner
- Selected: Black circle with white checkmark
- Unselected: Empty white circle
2Viewing Expert Details
Tap on an expert card to view their detailed profile:
- Profile Information: Large profile picture, name, and rating
- Contact Details: Email, phone number
- Salon Information: Salon name and address
- Services: List of services the expert provides
- Comments: Customer reviews and feedback
3Selecting an Expert
To choose an expert:
- Browse the available experts
- Tap on the expert you prefer
- The selected expert will show a checkmark
- Tap "Suivant" (Next) to continue
Step 4: Choose Date & Time
Select your preferred date and available time slot for the appointment.
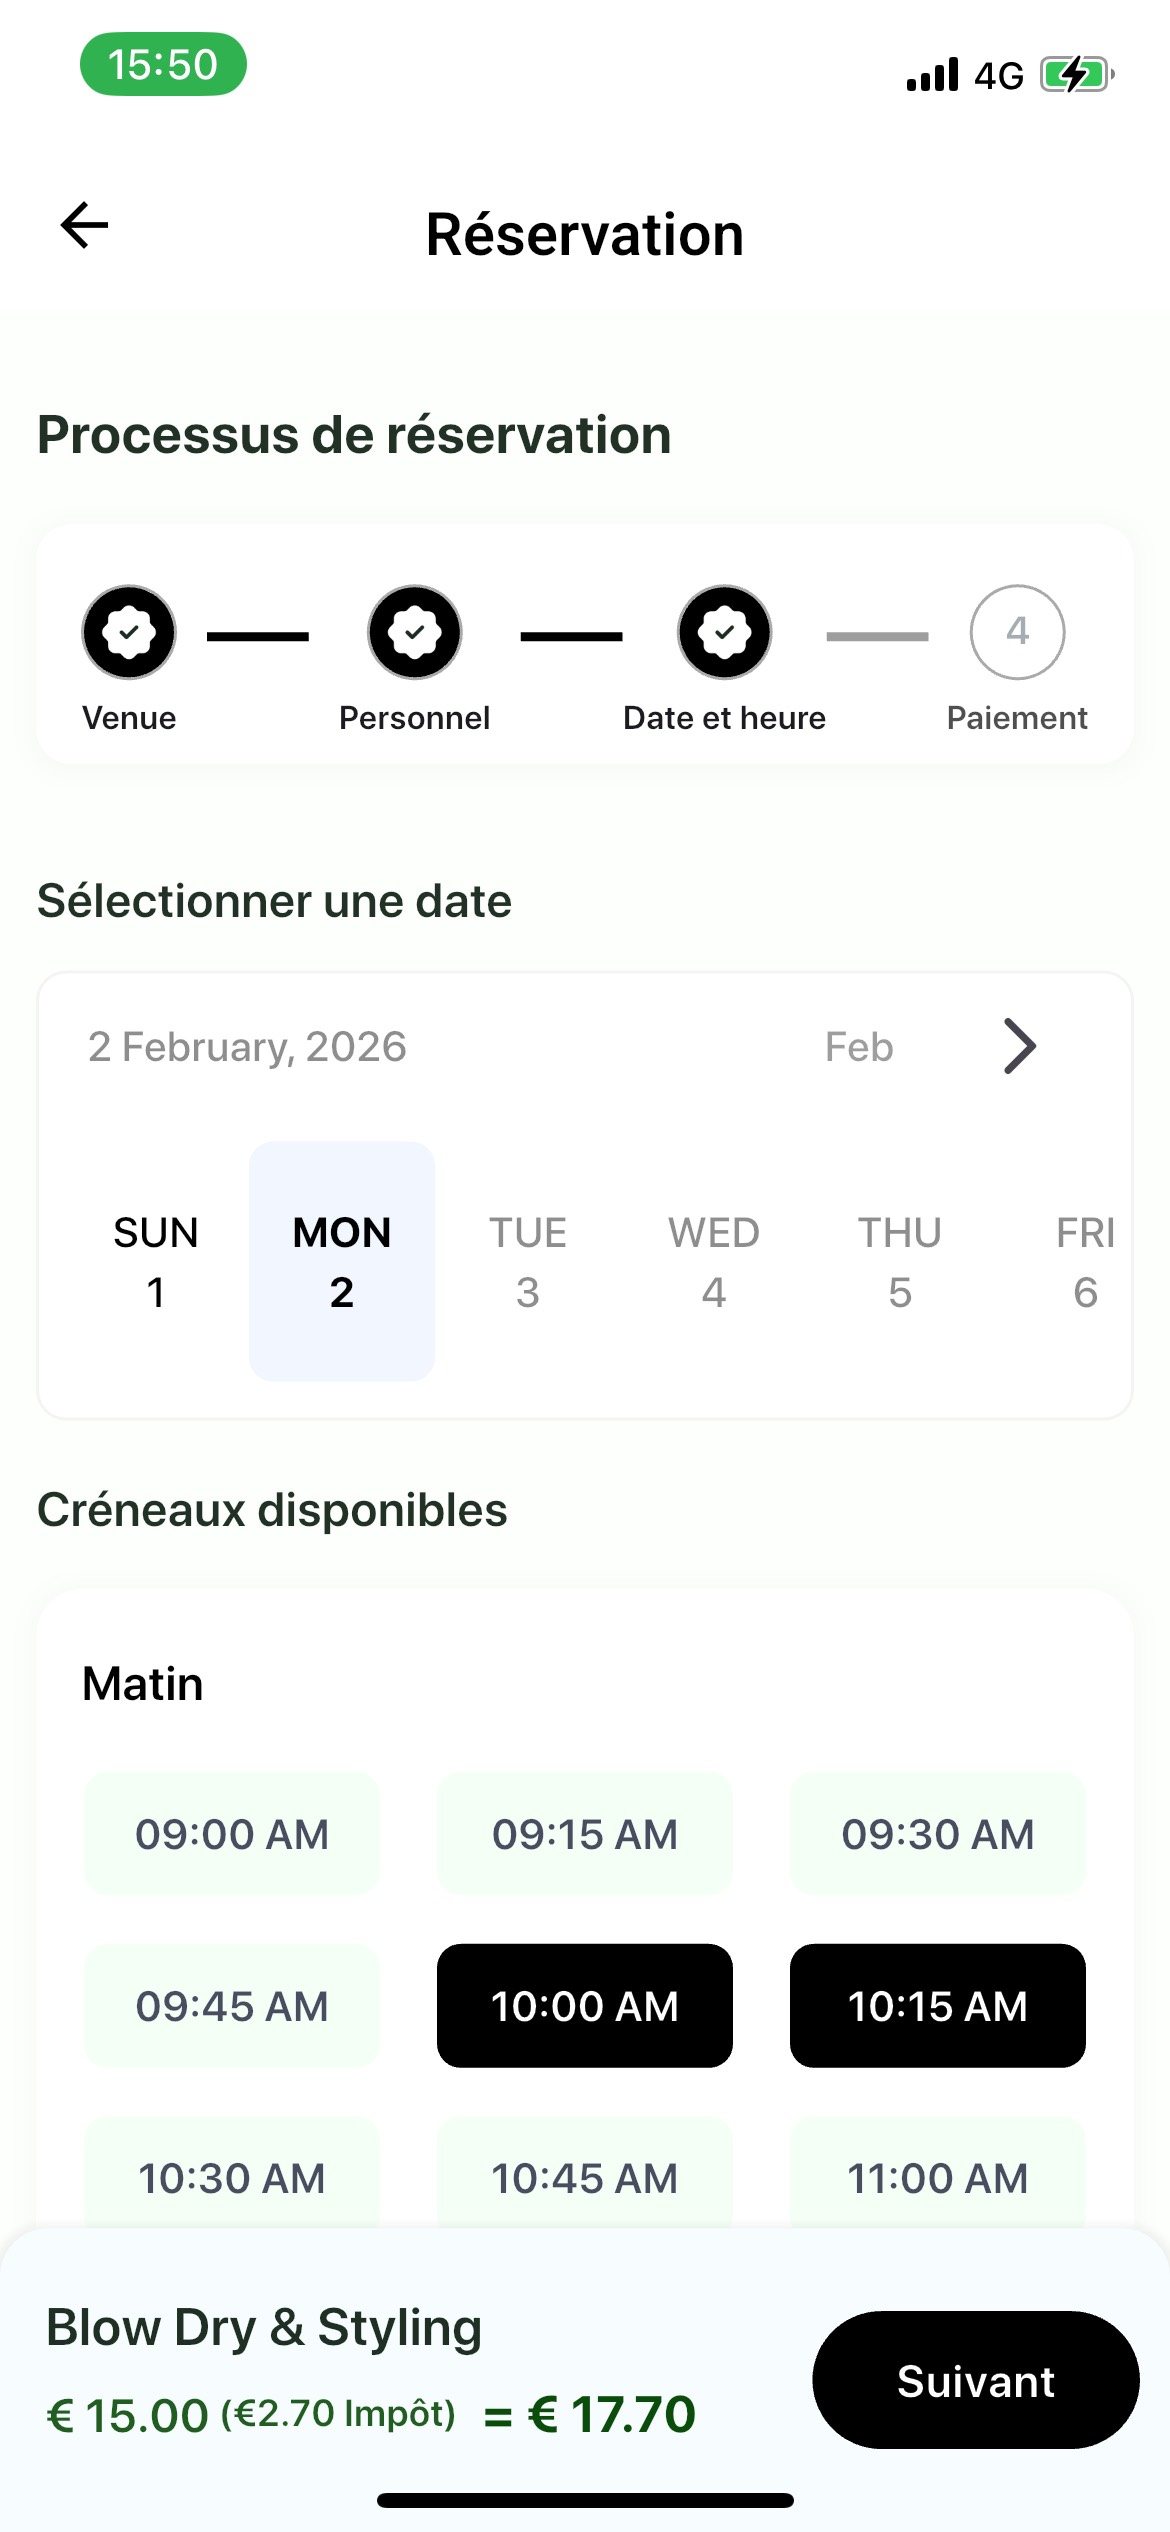
1Date Selection
The "Sélectionner une date" (Select a date) section includes:
- Current Date Display: Shows the selected month and date (e.g., "2 February, 2026")
- Month Navigation: "Feb" with arrow to navigate to other months
- Calendar View: Days of the week (SUN, MON, TUE, WED, THU, FRI, SAT) with dates
- Selected Date: Highlighted with a light grey background (e.g., "MON 2")
2Time Slot Selection
The "Créneaux disponibles" (Available slots) section shows:
- Time Categories: Organized by "Matin" (Morning), "Après-midi" (Afternoon), etc.
- Available Slots: Displayed as light green buttons with white text (e.g., "09:00 AM", "09:15 AM")
- Selected Slots: Displayed as black buttons with white text
- Unavailable Slots: Greyed out or not shown
3Selecting Date and Time
To choose your appointment time:
- Tap on a date in the calendar
- View available time slots for that date
- Tap on your preferred time slot
- You can select multiple slots if booking multiple services
- Selected slots will appear in black
- Tap "Suivant" (Next) to proceed to payment
Step 5: Select Payment Method
Choose how you want to pay for your booking.
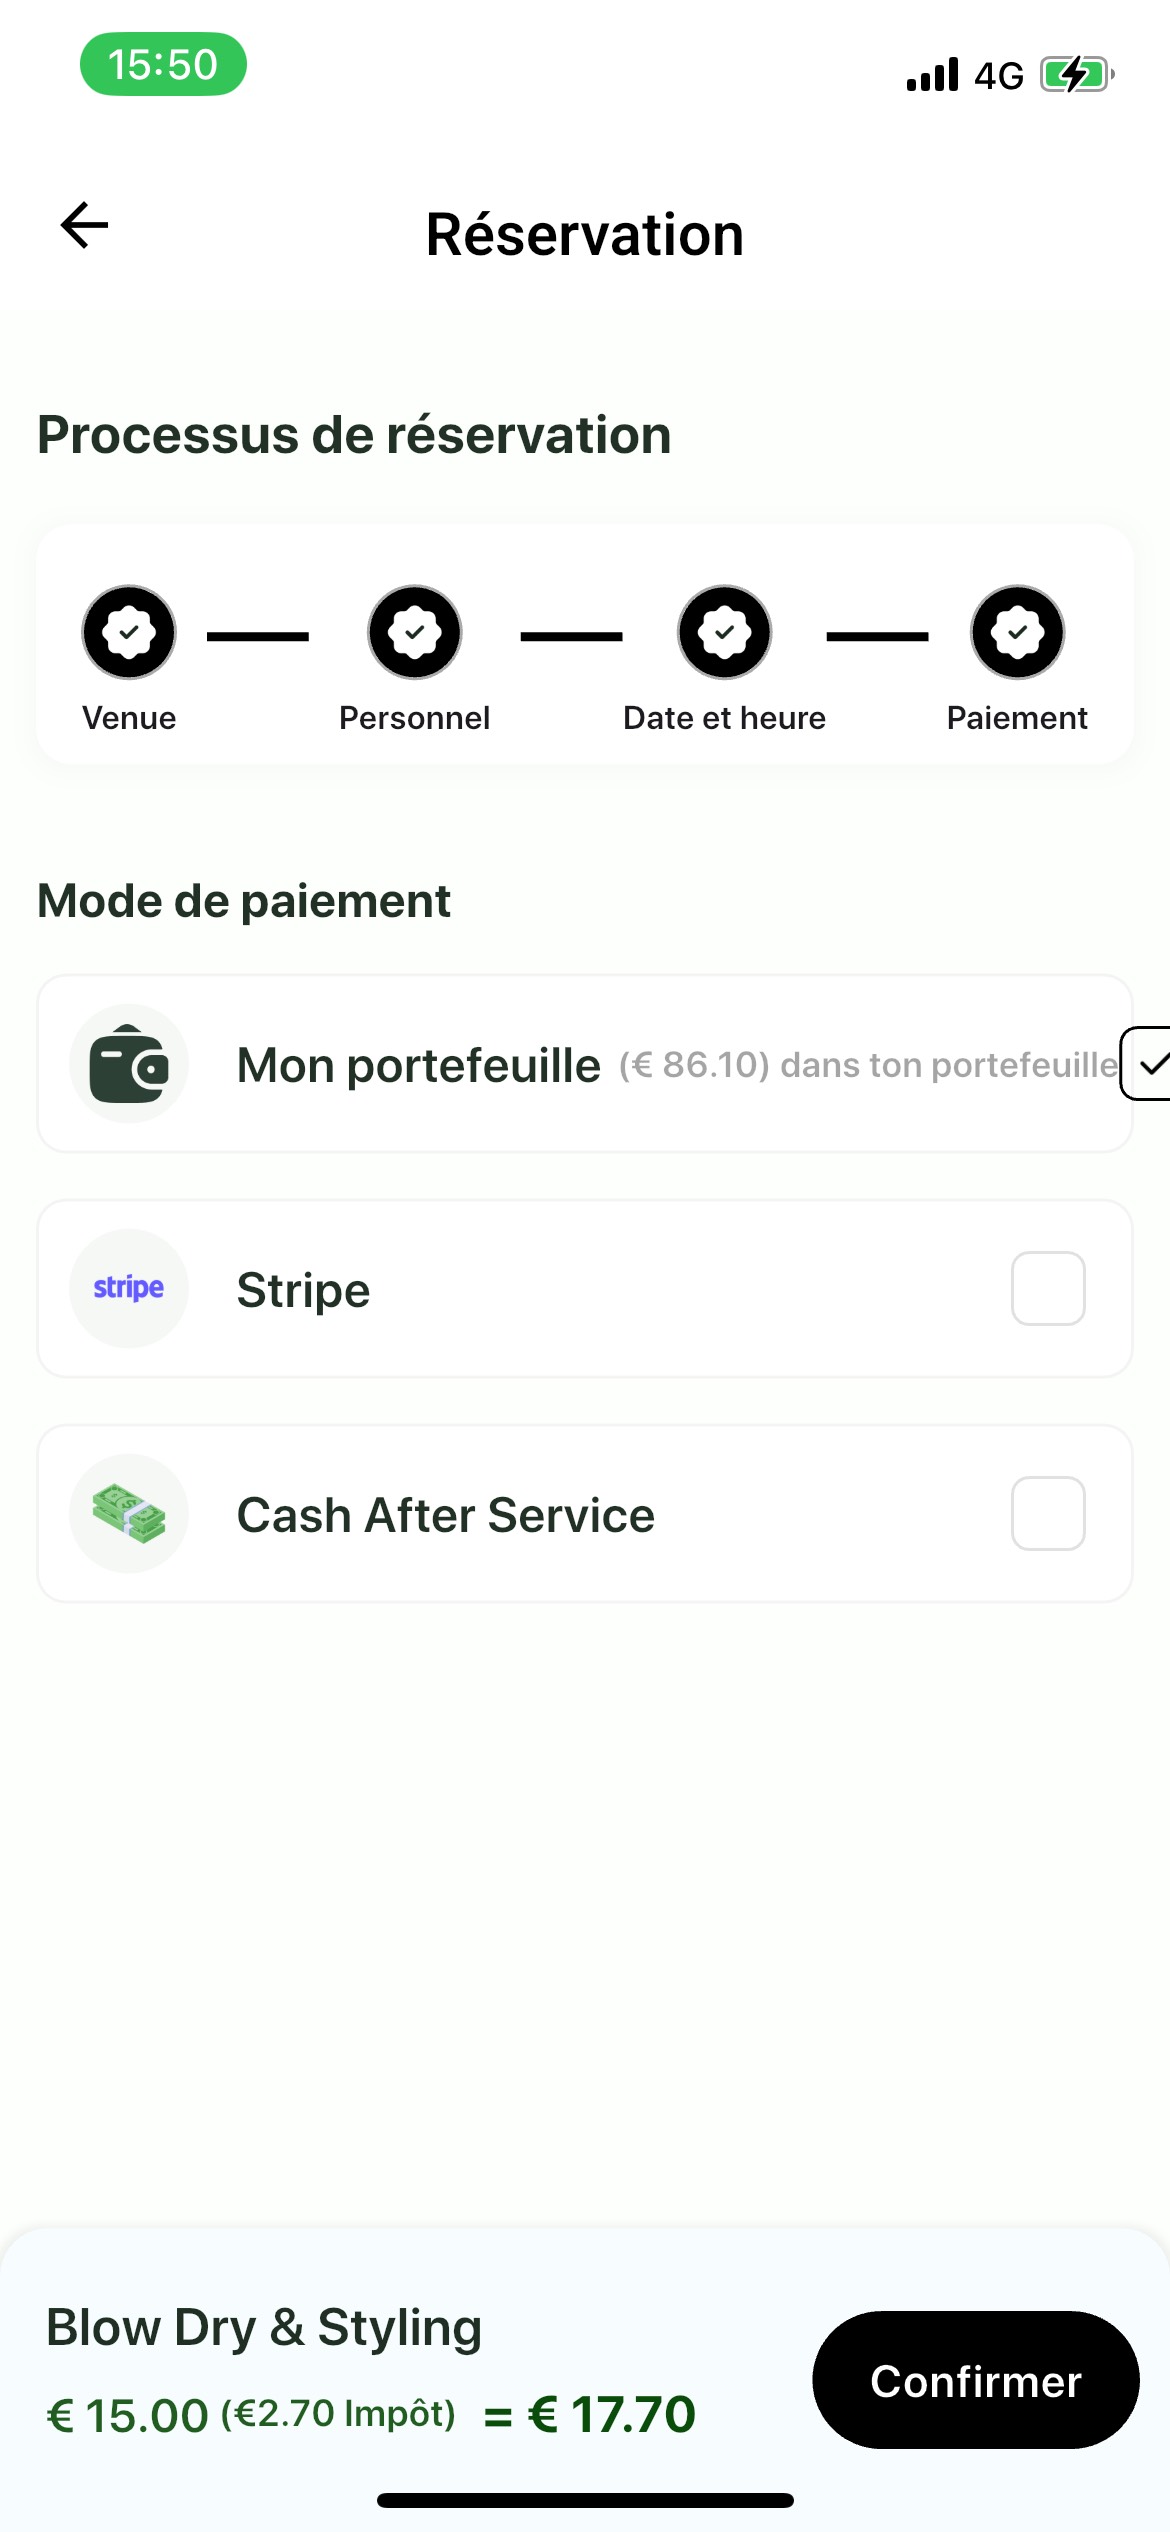
1Payment Options
The "Mode de paiement" (Payment Mode) screen offers three payment methods:
- "Mon portefeuille" (My wallet):
- Pay using your wallet balance
- Shows current balance (e.g., "€ 86.10 dans ton portefeuille")
- Selected with a green checkmark in a white square
- Wallet icon displayed
- "Stripe":
- Pay with credit/debit card via Stripe
- Shows Stripe logo
- Unselected shows empty white checkbox
- "Cash After Service":
- Pay in cash when the service is completed
- Shows banknotes icon
- Unselected shows empty white checkbox
2Selecting Payment Method
To choose a payment method:
- Review the available payment options
- Check your wallet balance if using wallet payment
- Tap on your preferred payment method
- The selected method will show a checkmark
- Review the price breakdown at the bottom
- Tap "Confirmer" (Confirm) to proceed
3Price Summary
The bottom of the screen shows:
- Service Name: The selected service (e.g., "Blow Dry & Styling")
- Price Breakdown: Base price + tax = total
- Example: "€ 15.00 (€2.70 Impôt) = € 17.70"
- Base price: €15.00
- Tax (Impôt): €2.70
- Total: €17.70
Step 6: Confirm Booking
Review your booking details and confirm the reservation.
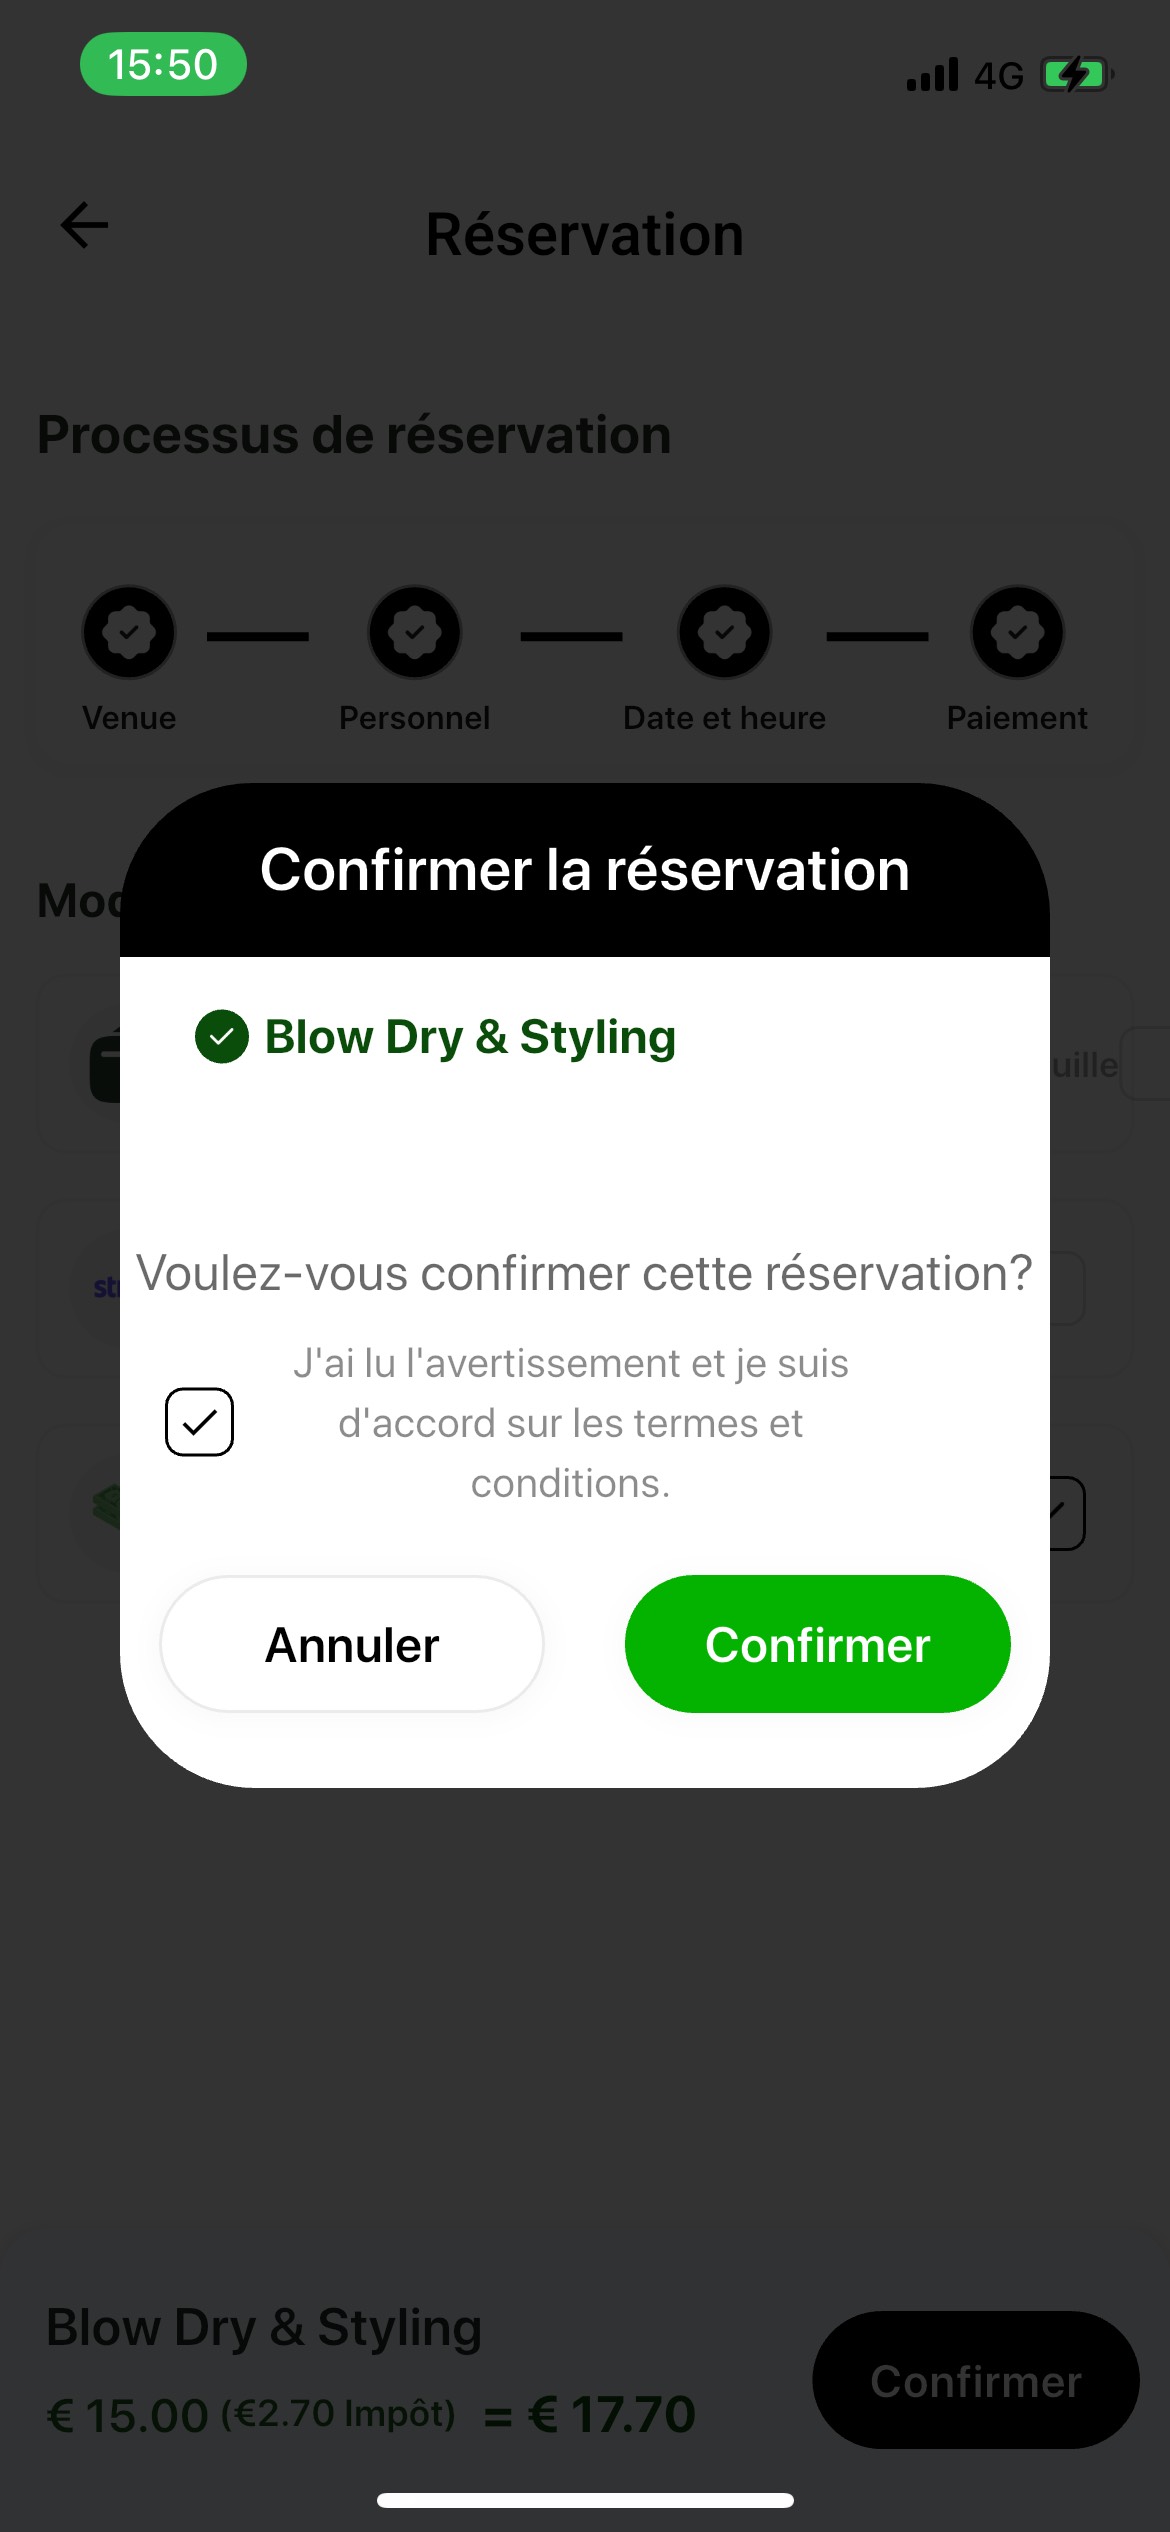
1Confirmation Dialog
After selecting payment method and tapping "Confirmer", a confirmation popup appears with:
- Header: "Confirmer la réservation" (Confirm the reservation) in black header
- Service Name: Displayed with a green checkmark (e.g., "Blow Dry & Styling")
- Confirmation Question: "Voulez-vous confirmer cette réservation?" (Do you want to confirm this reservation?)
- Terms Checkbox: "J'ai lu l'avertissement et je suis d'accord sur les termes et conditions." (I have read the warning and I agree to the terms and conditions.)
2Accepting Terms
Before confirming:
- Read the terms and conditions
- Check the checkbox to accept the terms
- The checkbox must be checked to proceed
3Final Confirmation
The dialog provides two options:
- "Annuler" (Cancel): White button to go back and make changes
- "Confirmer" (Confirm): Green button to finalize the booking
Once you tap "Confirmer", your booking will be processed and confirmed.
4After Confirmation
After confirming your booking:
- You'll receive a booking confirmation
- A booking ID will be generated
- You'll receive a notification about the booking
- The booking will appear in your "Booking" screen
- You can view, modify, or cancel it from there
Booking Process Summary
The complete booking process follows these steps:
- Select Salon: Browse and choose a salon, then select a service
- Choose Venue: Decide between "At Salon" or "At Home"
- Select Expert: Choose your preferred service provider
- Pick Date & Time: Select your preferred appointment slot
- Payment Method: Choose wallet, Stripe, or cash payment
- Confirm: Review and confirm your booking
Booking Screen
The Booking Screen allows you to view and manage all your appointments. You can filter bookings by status and see detailed information about each appointment.
Header & Search
1Screen Title
The screen displays "Booking" as the main title at the top.
2Search Functionality
Use the search bar with the magnifying glass icon to quickly find specific bookings by:
- Booking ID
- Service name
- Salon name
- Expert name
Filter Tabs
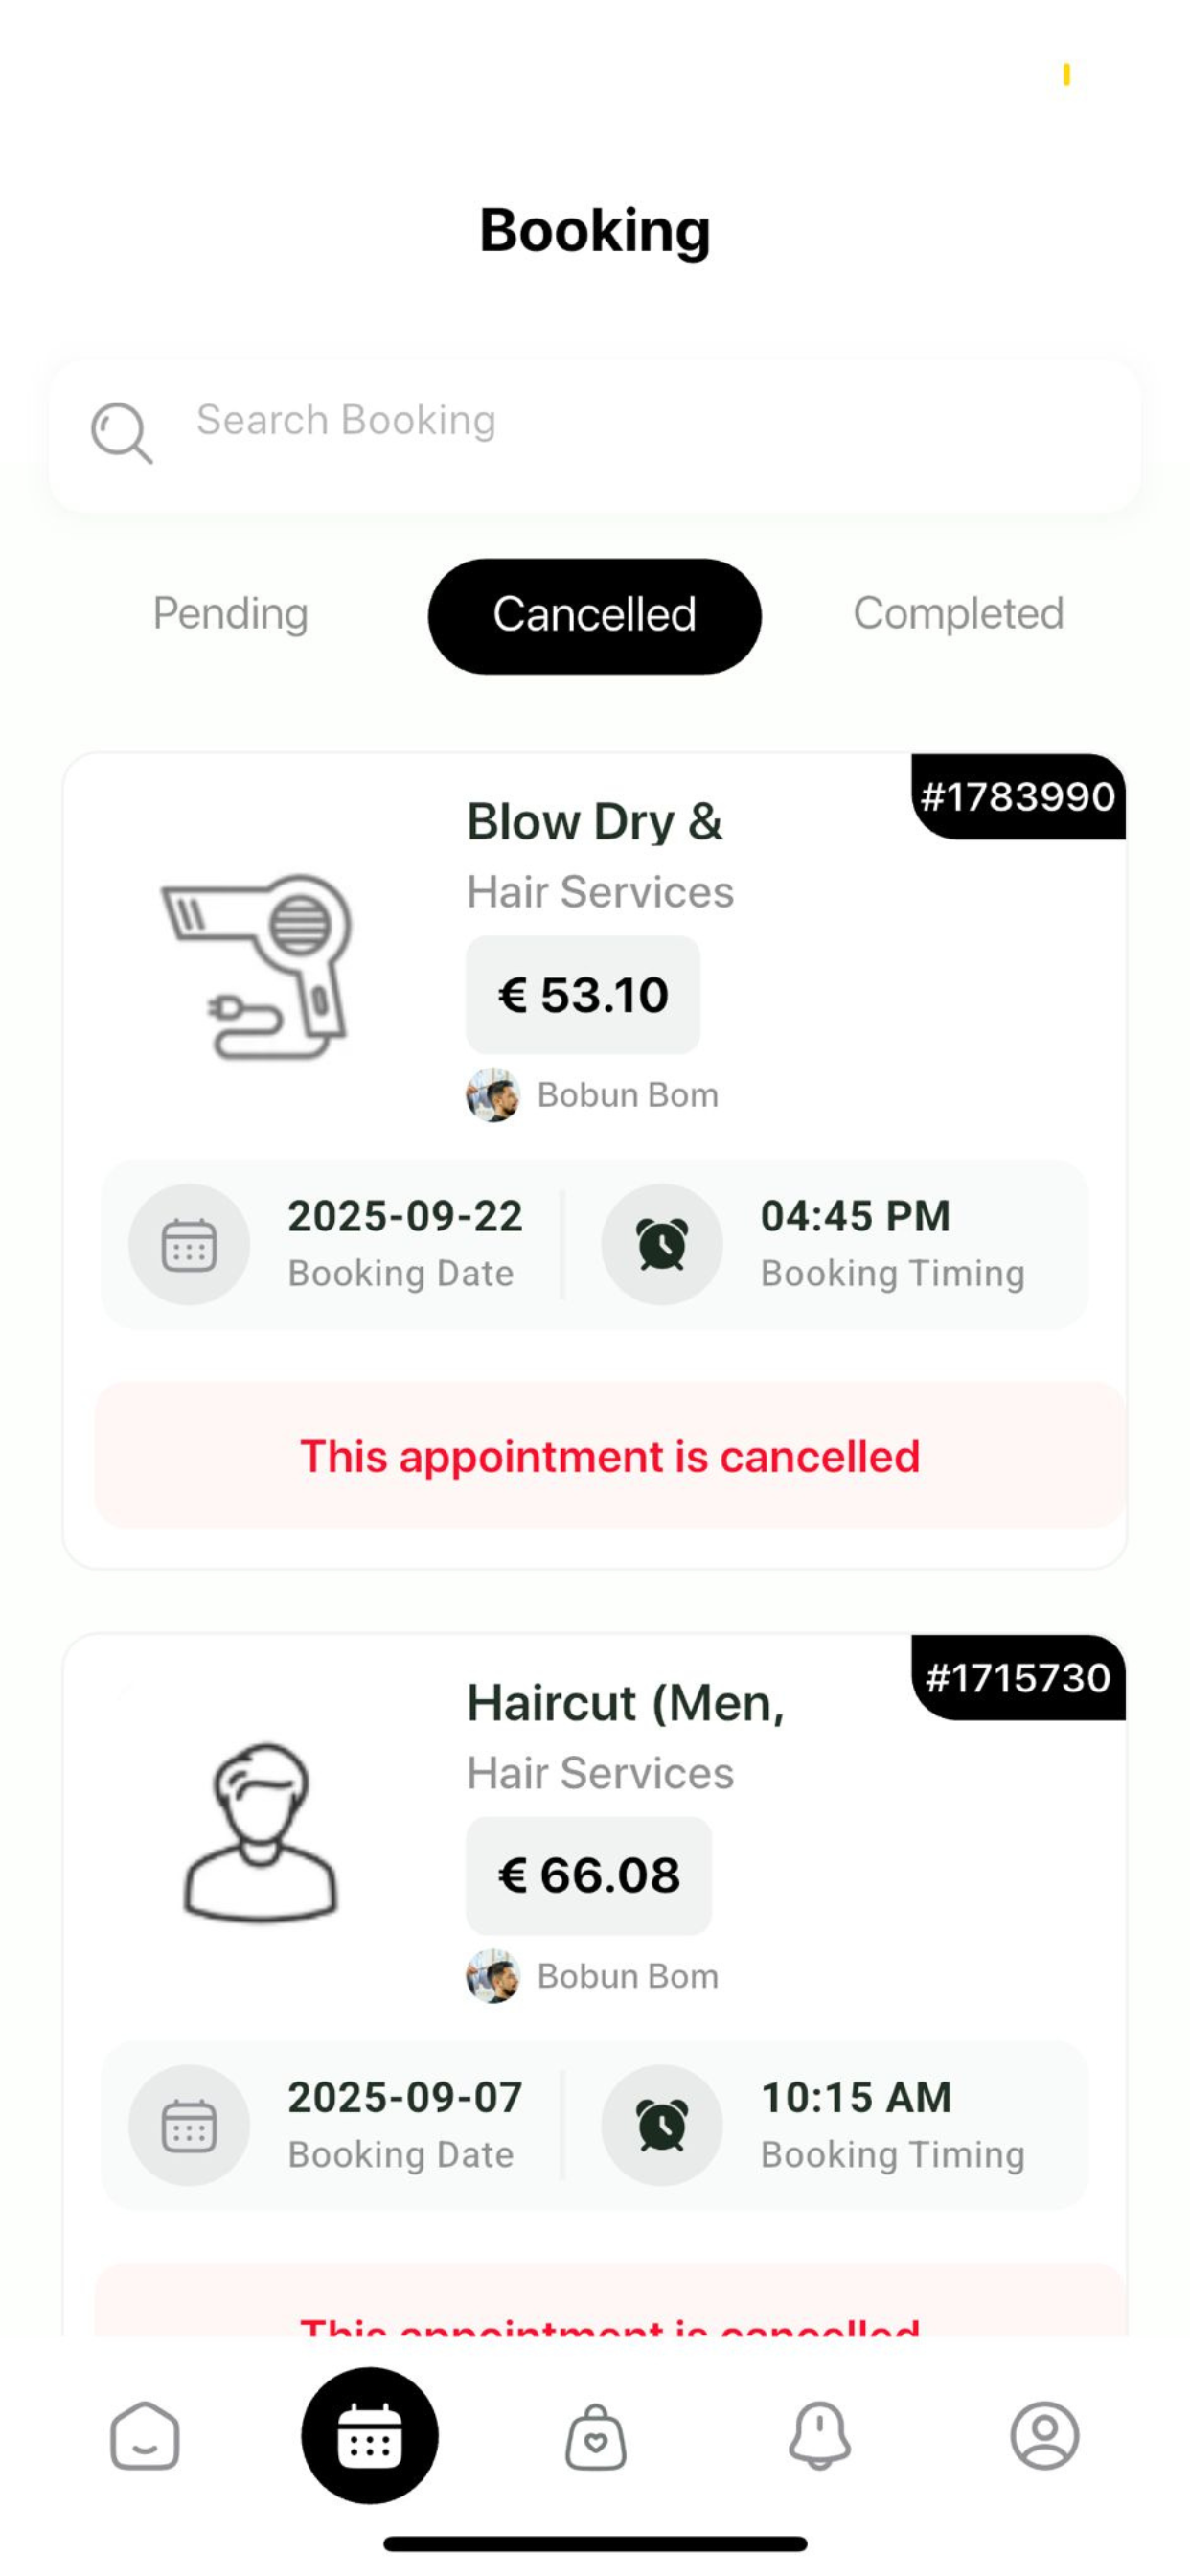
Three filter tabs allow you to organize your bookings:
- Pending: Appointments that are scheduled but not yet completed
- Cancelled: Appointments that have been cancelled (shown with red banner)
- Completed: Past appointments that have been finished
The active tab is highlighted with a black background and white text.
Booking Cards
Each booking is displayed as a card with the following information:
3Booking Details
- Service Icon: Visual representation of the service type (e.g., hairdryer, scissors)
- Booking ID: Unique identifier displayed in a black tag (e.g., "#1783990")
- Service Name: Full description of the service (e.g., "Blow Dry & Hair Services")
- Price: Total cost in bold (e.g., "€ 53.10")
- Expert: Profile picture and name of the service provider (e.g., "Bobun Bom")
- Booking Date: Calendar icon with date (e.g., "2025-09-22")
- Booking Time: Clock icon with time (e.g., "04:45 PM")
- Status Banner: Color-coded status indicator (red for cancelled, green for confirmed, etc.)
Managing Bookings
From the booking screen, you can:
- View detailed information about each appointment
- Cancel upcoming appointments
- Reschedule appointments (if allowed by the salon)
- Contact the salon or expert
- Leave reviews for completed services
Product Category
The Product Category screen helps you browse and discover services organized by category. This screen provides an organized way to explore all available services.

Header Section
1Screen Title
The screen displays "Product Category" as the main title, with a welcoming subtitle: "You Have Been Missed For A Long Time."
2Navigation Icons
- Left: Shopping bag with heart icon - access your favorites
- Right: System status indicators
Search Functionality
The search bar at the top allows you to quickly find specific products or services. Simply type keywords related to what you're looking for, and the app will filter the results accordingly.
Category Grid
The main content area displays categories in a clean 2x3 grid layout. Each category card includes:
3Category Cards
Each category is presented as a white card with rounded corners containing:
- Icon: Visual representation of the category
- Category Name: Full or abbreviated category title
Available Categories
- Hygiene & Sal... - Personal care and hygiene services
- Tools & Equip... - Professional tools and equipment
- Makeup & Dec... - Makeup services and decorative treatments
- Nail Care - Manicure, pedicure, and nail art services
- Skin & Spa - Facial treatments and spa services
- Hair Care - Haircut, styling, and hair treatment services
4Browsing Categories
Tap on any category card to:
- View all services within that category
- See available salons offering those services
- Filter by price, location, or rating
- Book services directly
Navigation
The bottom navigation bar shows the shopping bag icon highlighted, indicating you're in the product/category browsing section.
Notifications
The Notifications screen keeps you informed about important updates, booking confirmations, reminders, and other relevant information about your appointments and account.
Header Section
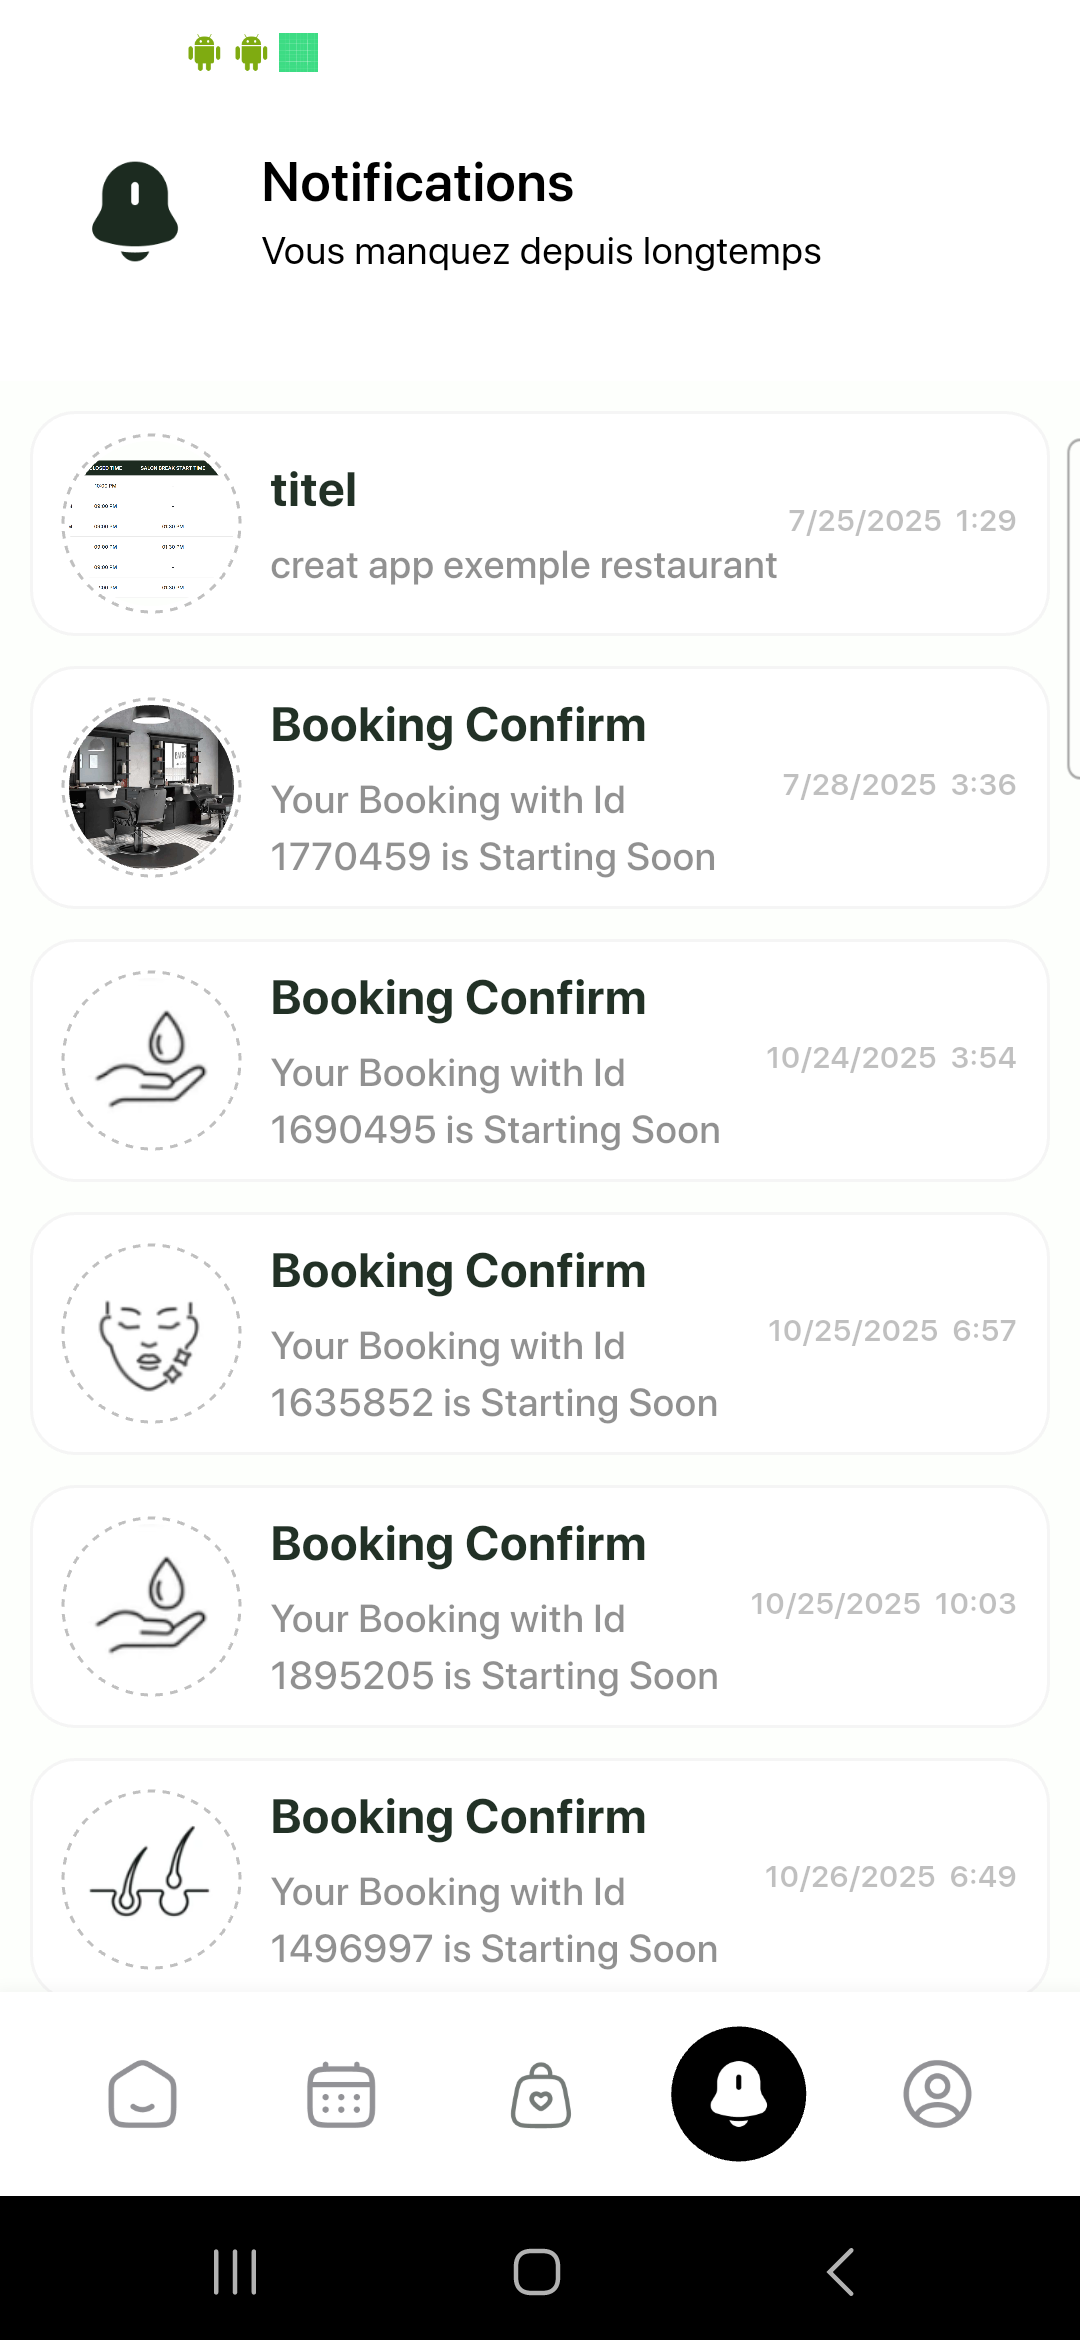
1Screen Title
The screen displays a bell icon and the title "Notifications" with a subtitle: "Vous manquez depuis longtemps" (You've been missed for a long time).
Notification List
Notifications are displayed as individual cards, each containing:
2Notification Card Elements
- Icon: Circular icon representing the notification type (schedule, salon interior, service icon, etc.)
- Title: Brief notification title (e.g., "Booking Confirm", "titel")
- Description: Detailed message about the notification
- Date/Time: Timestamp showing when the notification was received (format: M/D/YYYY H:MM)
Notification Types
Booking Confirmations
Most notifications are booking-related, such as:
- "Booking Confirm" - Notifications when your booking is confirmed
- "Your Booking with Id [ID] is Starting Soon" - Reminders before your appointment
- Booking status updates (confirmed, cancelled, rescheduled)
3Viewing Notification Details
Tap on any notification card to:
- View full details about the booking
- Navigate directly to the booking screen
- Take actions like confirming or cancelling
Notification Management
The notifications screen helps you:
- Stay updated on your appointment status
- Receive reminders before your bookings
- Get notified about special offers and promotions
- Track important account updates
Profile & Wallet
The Profile screen is your personal account hub, providing access to account management, wallet management, order history, and app settings.

User Profile Section
1Profile Information
The top of the screen displays:
- Profile Picture: Your profile photo (circular avatar)
- Name: Your full name (e.g., "Brins Bfi")
- Email: Your registered email address (e.g., "brondonwilly@gmail.com")
Menu Options
The profile screen provides four main menu options, each displayed as a card with an icon, title, description, and navigation arrow:
2Mon compte (My Account)
Access your account details including:
- Account information and settings
- Email and messaging ID
- Contact information
- Profile editing options
3Mon portefeuille (My Wallet)
This is a crucial section for managing your finances:
- Wallet Balance: View your current wallet balance
- Transaction History: See all your wallet transactions
- Add Money: Recharge your wallet using various payment methods
- Payment Methods: Manage your payment options
4Ma commande (My Order)
View and manage your orders:
- Order history
- Current and past bookings
- Order details and receipts
- Service history
5Paramètre (Settings)
Configure your app preferences:
- Language: Change the application language
- Account Management: Delete account or update preferences
- Notifications: Manage notification settings
- Privacy: Control privacy and data settings
Wallet Recharge Process
When you need to add money to your wallet:
- Navigate to Profile (person icon in bottom navigation)
- Tap on "Mon portefeuille" (My Wallet)
- Select "Add Money" or "Recharge Wallet"
- Choose your payment method (Stripe, MTN MoMo, etc.)
- Enter the amount you want to add
- Complete the payment process
- Your wallet balance will be updated immediately
Bottom Navigation
The profile icon in the bottom navigation is highlighted when you're on this screen, indicating your current location in the app.
Wallet
The Wallet section allows you to manage your account balance, add funds, and view your transaction history. This is essential for making quick payments when booking services.

Wallet Balance Display
1Current Balance
The prominent teal/green balance card displays:
- "Mon solde" (My balance): Label in white text
- Balance Amount: Current balance in large, bold white text (e.g., "€ 86.10")
- Visual Elements: Stylized wallet or coin graphics in lighter teal
This card provides an at-a-glance view of your available funds.
Quick Actions
2Action Buttons
Two action buttons are available below the balance card:
- "Ajouter un montant" (Add an amount):
- Red button with white text
- Takes you to the wallet recharge screen
- Allows you to add money using various payment methods
- "Histoire" (History):
- Black button with white text
- Opens your transaction history
- Shows all wallet activities (recharges, payments, refunds)
Recharging Your Wallet
3Adding Funds
To add money to your wallet:
- Tap the "Ajouter un montant" (Add an amount) button
- Enter the amount you want to add
- Select your payment method (Stripe or MTN MoMo)
- Complete the payment process
- Your balance will be updated immediately after successful payment
Viewing Transaction History
4History Access
To view your wallet transactions:
- Tap the "Histoire" (History) button
- View all your wallet activities including:
- Wallet recharges (credits)
- Service payments (debits)
- Refunds (credits)
- Transaction dates and times
- Transaction IDs
Using Wallet for Payments
5Payment Process
When booking a service:
- Select "Mon portefeuille" (My wallet) as your payment method
- Ensure your balance is sufficient to cover the total (including tax)
- The amount will be deducted from your wallet upon confirmation
- If balance is insufficient, you'll be prompted to recharge
Expert App Documentation
Welcome to the Skedisy Expert App documentation. This comprehensive guide will help you understand and utilize all features of the expert application, designed to help service providers manage their bookings, revenue, schedules, and customer interactions efficiently.
Table of Contents
My Revenue
The My Revenue screen provides a comprehensive overview of your earnings, allowing you to track your income across different time periods and view reservation statistics.
Header Section
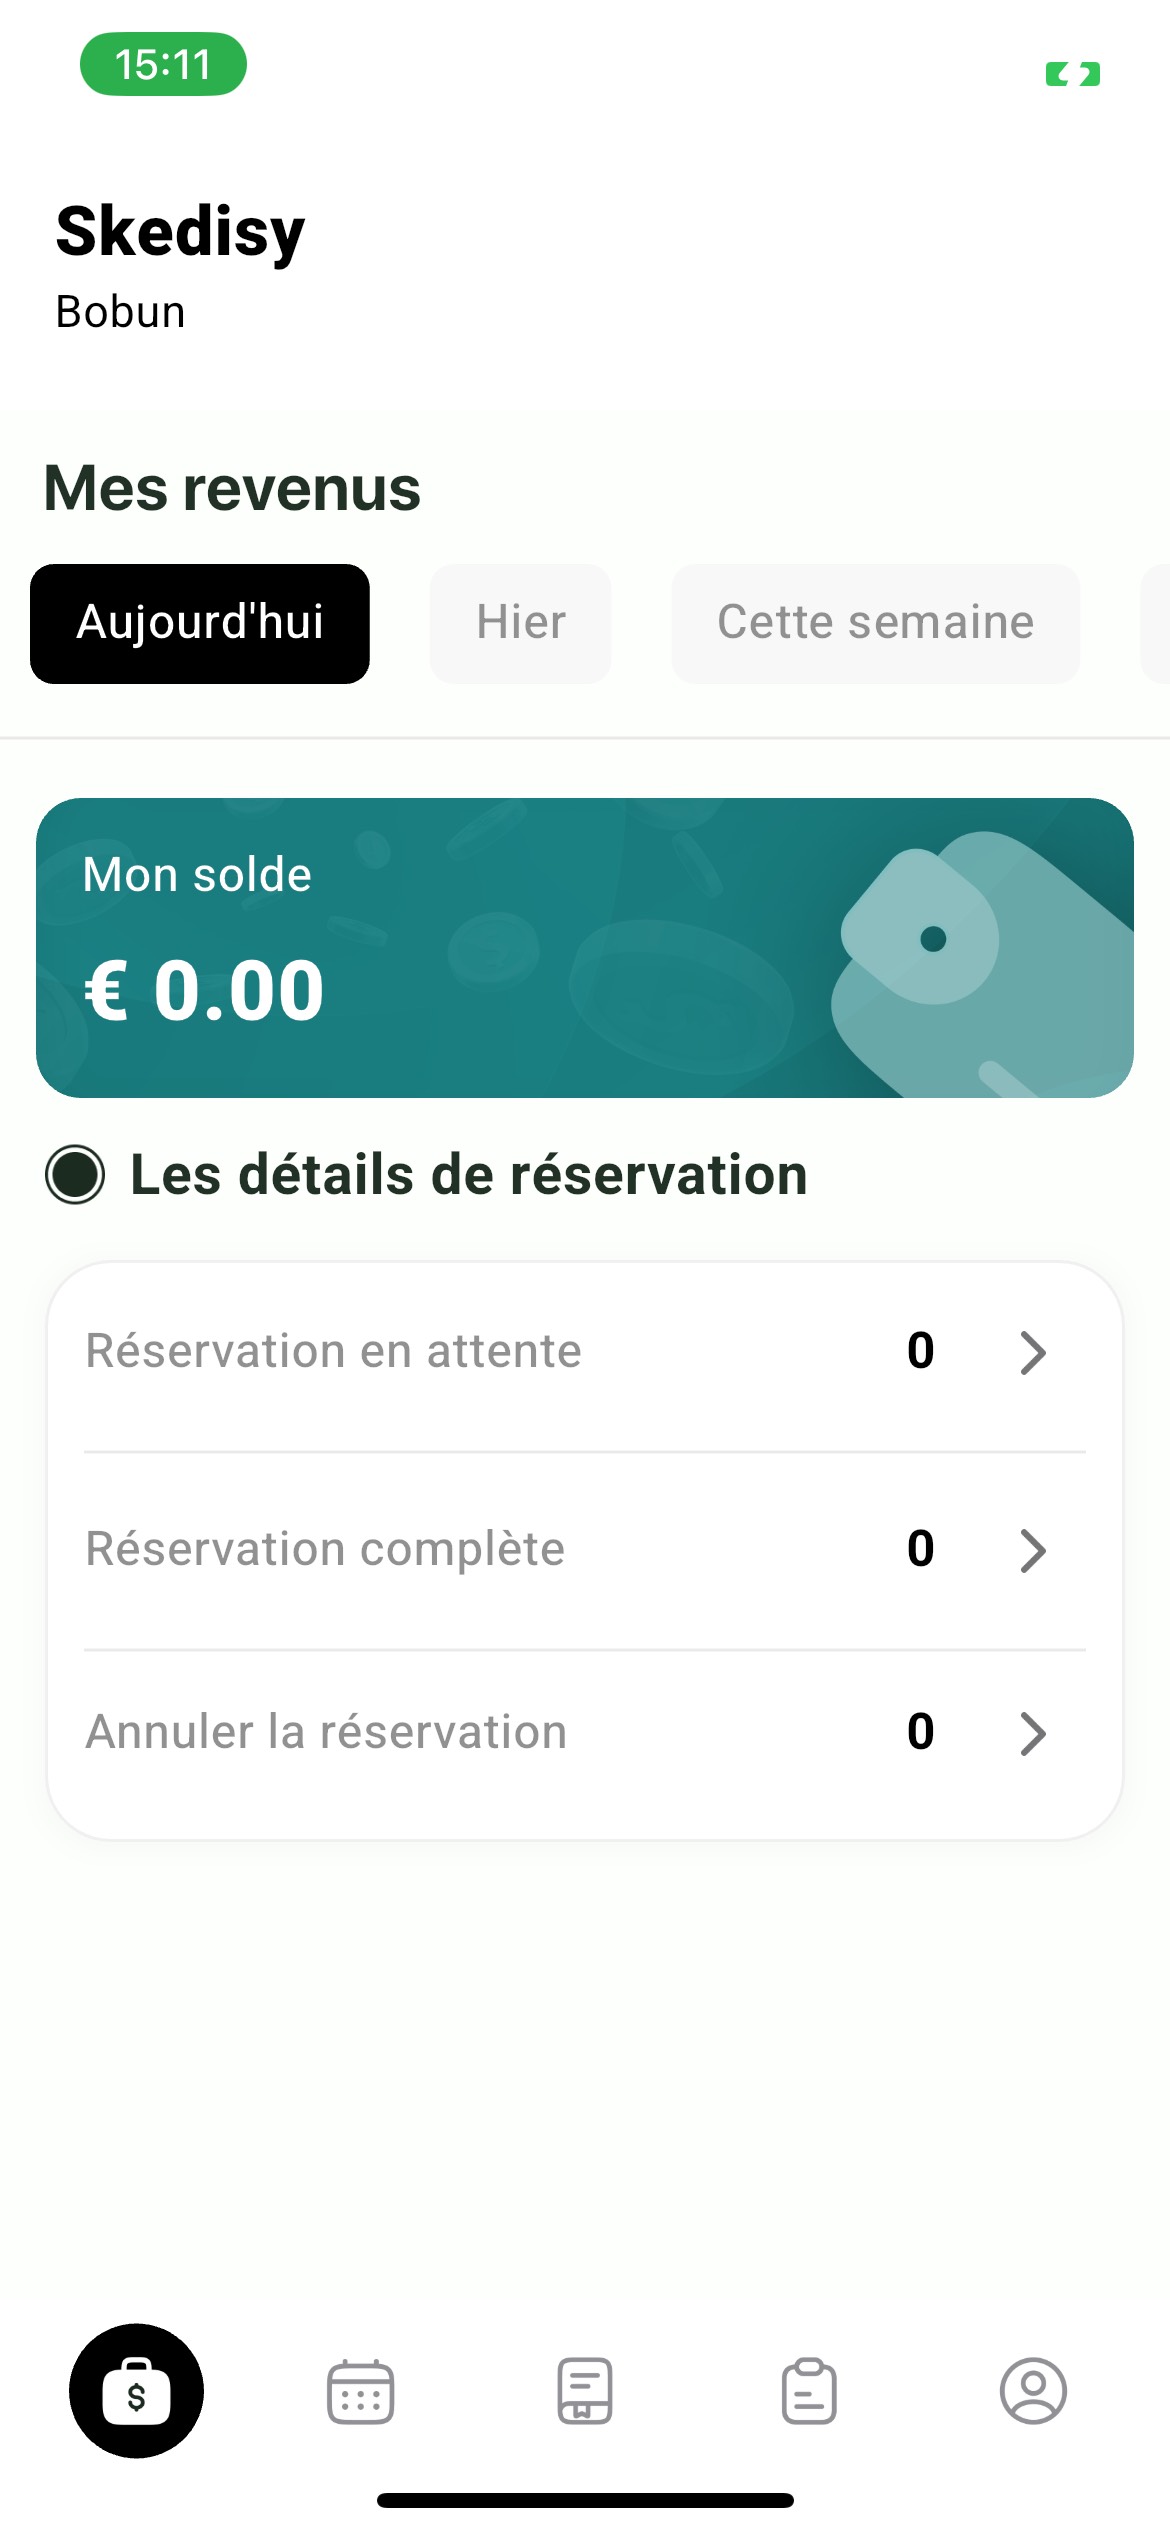
1App Name & User
The top of the screen displays:
- "Skedisy" - The app name in bold black text
- User Name - Your name (e.g., "Bobun") displayed below the app name
Date Filters
2Time Period Selection
The "Mes revenus" (My Revenue) section includes date filter buttons:
- "Aujourd'hui" (Today) - Selected by default, shown with black background and white text
- "Hier" (Yesterday) - View yesterday's revenue
- "Cette semaine" (This week) - View weekly revenue summary
Tap any filter button to view revenue for that specific time period.
Balance Card
3Current Balance
The prominent teal balance card displays:
- "Mon solde" (My balance) - Label in white text
- Balance Amount - Your current balance in large, bold white text (e.g., "€ 0.00")
- Visual Icon - A stylized graphic on the right side of the card
This card provides an at-a-glance view of your current earnings balance.
Reservation Details Section
4Reservation Statistics
The "Les détails de réservation" (Reservation Details) section shows three key metrics:
- "Réservation en attente" (Pending reservation) - Number of upcoming bookings
- "Réservation complète" (Completed reservation) - Number of finished appointments
- "Annuler la réservation" (Cancel reservation) - Number of cancelled bookings
Each metric displays a count on the right side. Tap on any card to view detailed information about that category.
Reservation Details
The Reservation Details screen allows you to view and manage all your customer bookings. You can filter by status and take actions on individual reservations.
Header & Welcome
1Screen Information
The screen displays:
- App Name: "Skedisy" in bold black text
- Welcome Message: "Welcome to our best services, [Your Name]"
Filter Tabs
2Reservation Status Filters
Three filter tabs help you organize bookings:
- "Commande en cours" (Order in progress) - Currently active bookings, highlighted with black background
- "annuler la commande" (Cancel the order) - Cancelled bookings
- "Co" - Additional filter option (likely "Completed")
The active tab is highlighted with a black background and white text.
Booking Cards
Each booking is displayed as a detailed card containing:
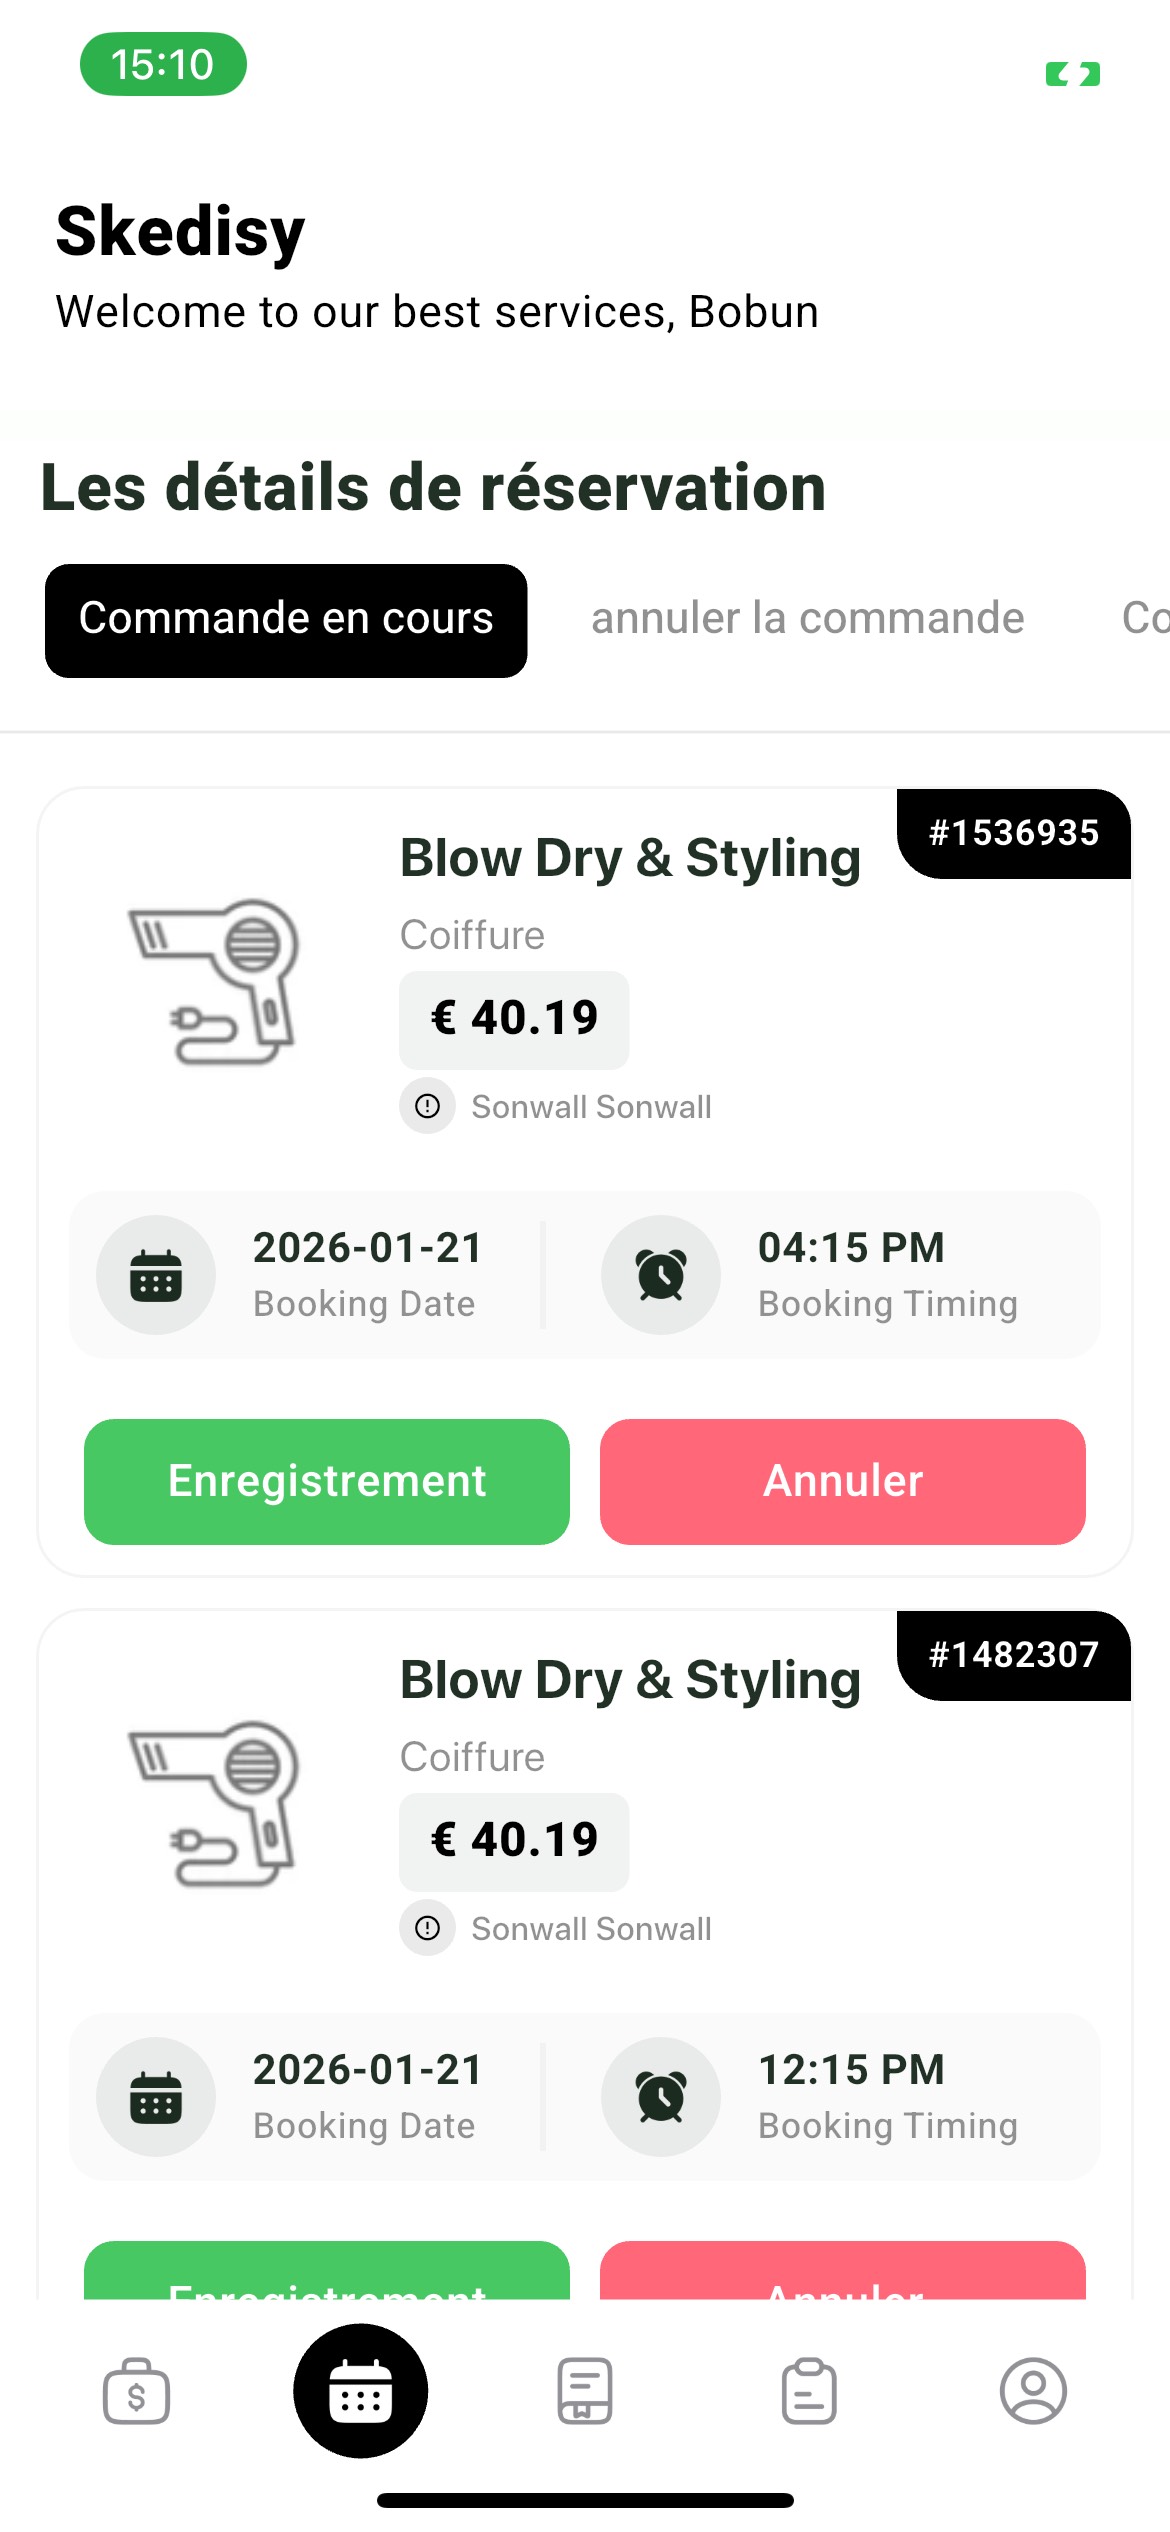
3Booking Information
- Service Icon: Visual representation of the service (e.g., hairdryer icon)
- Service Name: Full service description (e.g., "Blow Dry & Styling")
- Category: Service category (e.g., "Coiffure" - Hairdressing)
- Price: Service price displayed in a light gray pill (e.g., "€ 40.19")
- Provider Name: Your name or the service provider (e.g., "Sonwall Sonwall")
- Booking ID: Unique identifier in a black pill (e.g., "#1536935")
- Booking Date: Calendar icon with date (e.g., "2026-01-21")
- Booking Time: Clock icon with time (e.g., "04:15 PM")
Action Buttons
4Managing Bookings
Each booking card includes two action buttons at the bottom:
- "Enregistrement" (Registration/Save) - Green button to confirm or save the booking
- "Annuler" (Cancel) - Red button to cancel the reservation
Use these buttons to manage individual bookings based on your availability and customer needs.
Slot Management
The Slot Management screen allows you to control your availability, set vacation mode, and manage your time slots for bookings. This is essential for maintaining an organized schedule.

Header Section
1Screen Title
The screen displays "Gestion des créneaux" (Slot Management) in bold dark green text, indicating this is the availability management section.
Date Picker
2Selecting Dates
The date picker interface includes:
- Current Date Display: Shows the selected date (e.g., "October 2, 2025")
- Month Navigation: "Oct" with arrow icon to navigate between months
- Day Selector: Horizontal row showing days of the week with dates:
- WED 1, THU 2 (selected - highlighted in blue-gray), FRI 3, SAT 4, SUN 5, MON 6
Tap on any day to view and manage slots for that specific date.
Vacation Mode
3Setting Vacation Mode
The "Mode vacances" (Vacation Mode) section allows you to:
- Toggle Vacation Mode: Red toggle switch to enable/disable vacation mode
- Status Message: "Maintenant non disponible pour..." (Now unavailable for...)
- Visual Indicator: Red banner with sun/umbrella icon
When vacation mode is ON (red toggle), you won't receive new bookings during that period.
Available Slots
4Time Slot Management
The "Créneaux disponibles" (Available Slots) section displays:
- Legend: Color-coded indicators:
- "Pas disponible" (Not available) - Light pink-beige color
- "Disponible" (Available) - Light green color
- Time Slot Grid: Organized by time periods (e.g., "Matin" - Morning)
Time Slot Examples
The morning section shows slots in 15-minute intervals:
- 09:00 AM, 09:15 AM, 09:30 AM
- 09:45 AM, 10:00 AM, 10:15 AM
- 10:30 AM, 10:45 AM, 11:00 AM
- 11:15 AM, 11:30 AM, 11:45 AM
5Managing Slots
To manage your availability:
- Select the date you want to manage
- Tap on any time slot to toggle its availability
- Green slots are available for booking
- Pink-beige slots are blocked/unavailable
- Changes are saved automatically
Order Details
The Order Details screen provides a comprehensive view of all your orders and transactions, allowing you to track your business activity over different time periods.

Header Section
1Screen Title
The screen displays:
- App Name: "Skedisy" in bold black text
- Welcome Message: "Welcome to our best services, [Your Name]"
- Section Title: "détails de la commande" (Order details) in bold black text
Date Filters
2Time Period Selection
Filter your orders by time period using the filter buttons:
- "Aujourd'hui" (Today) - Selected by default, shown with black background and white text
- "Hier" (Yesterday) - View yesterday's orders
- "Cette semaine" (This week) - View weekly orders
- "Ce mois-c" (This month) - View monthly orders
Tap any filter to view orders for that specific time period.
No Data State
3Empty State
When there are no orders for the selected period, the screen displays:
- Illustration: A large magnifying glass with a sad face icon
- Supporting Icons: Question marks and document icons around the magnifying glass
- Message: "Aucune donnée disponible..!" (No data available..!)
This indicates that no orders match the selected filter criteria.
Viewing Order Details
When orders are available, you can:
- View detailed information about each order
- See customer information and booking details
- Track payment status and amounts
- Access order history for analysis
Expert Profile
The Expert Profile screen is your personal account hub, providing access to account management, wallet/revenue tracking, settings, and support options.

Profile Header
1Profile Information
The top of the screen displays:
- Screen Title: "Profil" (Profile) in bold black text
- Profile Picture: Your circular profile photo
- Name: Your full name (e.g., "Bobun Bom")
- User ID: Your unique identifier (e.g., "ID :- 1358173")
Menu Options
The profile screen provides five main menu options, each displayed as a card with an icon, title, description, and navigation arrow:
2Mon compte (My Account)
Access your account details including:
- Account information and settings
- Messaging ID and contact details
- Profile editing options
- Personal information management
3Portefeuille (Wallet)
Manage your earnings and finances:
- My Revenue: View your earnings summary
- Order Summary: Track your order history and payments
- Transaction History: View all financial transactions
- Payout Management: Access withdrawal options
4Paramètre (Settings)
Configure your app preferences:
- Notifications: Manage notification preferences
- Languages: Change the application language
- App Settings: Customize your app experience
- Privacy Settings: Control your privacy options
5À propos de l'application (About the Application)
Access important information:
- Privacy Policy: Read the privacy policy
- Terms of Use (CGU): Review terms and conditions
- App Version: Check your app version
- Legal Information: Access legal documents
6Se plaindre (Complain/Report)
Report issues or provide feedback:
- Submit Complaints: Report problems or concerns
- Complaint History: View your previous reports
- Support Access: Contact customer support
- Feedback: Share your suggestions
Bottom Navigation
The profile icon in the bottom navigation is highlighted when you're on this screen, indicating your current location in the app. The navigation bar includes:
- Briefcase with $: Revenue/Dashboard
- Calendar: Schedule/Bookings
- Document/List: Orders/Details
- Another Document: Additional features
- Profile: Your account (currently active)
Salon Owner Portal Documentation
Welcome to the Skedisy Salon Owner Portal documentation. This comprehensive guide will help you understand and utilize all features of the web-based administrative dashboard, designed to help salon owners manage their business operations, staff, services, finances, and customer interactions efficiently.
Table of Contents
Navigation Structure
The portal features a left sidebar navigation with the following main sections:
- Menu: Dashboard access
- Expert: Staff management, reviews, complaints, and attendance
- Order: Order management
- Services: Service catalog management
- E-Commerce: Products and attributes
- Finance: Wallet, withdrawals, and transaction history
- Report: Salon time and holiday management
Dashboard Overview
The Dashboard is your main control center, providing a comprehensive overview of your salon's performance, key metrics, and business analytics.

Header Section
1Welcome Message
The top of the dashboard displays a personalized welcome message: "Welcome back, Salon! 👋" with a friendly emoji.
2User Profile
On the top right, you'll see:
- Your salon profile picture
- Salon name (e.g., "Solivans Hair")
- User type indicator ("Salon")
Key Metrics Cards
3Dashboard Overview Cards
The dashboard displays four key metric cards:
- TOTAL EXPERTS: Number of staff members (e.g., "7")
- COMPLETED BOOKING: Total completed appointments (e.g., "2")
- TOTAL REVENUE: Total earnings (e.g., "70.80 €")
- SALES COMMISSION: Platform commission (e.g., "6.00 €")
Each card includes a visual icon representing the metric type.
Data Analysis Section
4Revenue and Booking Analytics
The "Data Analysis" section provides:
- Graph Title: "SALON REVENUE AND BOOKING DATA"
- Visual Chart: Line graph showing revenue trends over time
- Y-Axis: Represents values (10, 15, 20, 25, 30)
- Current Value Indicator: Horizontal line at the current value
Use this graph to track your salon's performance trends and identify peak periods.
Experts Management
The Experts section allows you to manage all your staff members, including adding new experts, viewing their details, setting commission rates, and managing their status.

Header & Search
1Page Navigation
The page displays:
- Breadcrumbs: "Dashboard > Experts"
- Search Bar: "Searching for..." with magnifying glass icon to find specific experts
Adding Experts
2Add New Expert
Click the "+ Add expert" button to:
- Create a new staff member profile
- Enter expert details (name, email, mobile, etc.)
- Set commission rates
- Upload profile image
Experts Table
3Expert Information
The table displays the following columns for each expert:
- NO: Sequential number
- IMAGE: Profile picture
- NAME: Full name
- EMAIL: Email address
- MOBILE NO: Contact number
- UNIQUE ID: System-generated identifier
- COMMISSION: Commission percentage (sortable)
- RATING: Average customer rating (sortable)
- BLOCK: Toggle to block/unblock expert (sortable)
- BOOKING: Icon to view booking details
Managing Experts
4Expert Actions
For each expert, you can:
- View Details: Click on the expert row to see full information
- Block/Unblock: Toggle the block switch (red = blocked, green = active)
- View Bookings: Click the booking icon to see all appointments
- Edit Commission: Modify commission rates as needed
Reviews
The Reviews section allows you to view and manage all customer reviews for your salon and individual experts.

Page Structure
1Navigation
The page displays breadcrumbs: "Dashboard > Reviews"
Reviews Table
2Review Information
Each review displays:
- NO: Sequential number
- USER: Customer profile picture/avatar
- REVIEW: Review text (e.g., "Bon Travaille. Service Impeccable. Je Recommande")
- RATING: Star rating (1-5 stars, displayed in yellow)
- USER: Customer name (e.g., "Brins Bfi")
- BOOKINGID: Associated booking ID (e.g., "1770459")
- EXPERT: Expert name who provided the service (e.g., "BRON WILL")
- CREATED AT: Review date (e.g., "2025-10-23")
Pagination
3Viewing Reviews
Use the pagination controls at the bottom to:
- Select number of reviews per page (default: 10)
- Navigate between pages
- View total review count
Complaints
The Complaints section allows you to view and manage complaints from both customers (users) and experts (staff members).

Complaint Types
1Filtering Complaints
The page provides two tabs:
- "User complain": Complaints from customers (highlighted when selected)
- "Expert complain": Complaints from staff members
Switch between tabs to view different types of complaints.
2Complaint Type Filter
Use the "Complain type" dropdown to filter by:
- "ALL": View all complaints
- Specific complaint categories
Complaints Table
3Complaint Details
When complaints are available, the table displays:
- NO: Sequential number
- IMAGE: Profile picture of complainant
- BOOKINGID: Related booking ID
- USER NAME: Name of the person filing the complaint
- DETAILS: Complaint description
- DATE: Date of complaint
- TIME: Time of complaint
- STATUS: Current status (pending, resolved, etc.)
- INFO: Additional information or actions
Expert Attendance
The Expert Attendance section allows you to track staff attendance, view available days, absent days, and total working days for each expert.

Month Selection
1Selecting Time Period
Use the "Select month" field to choose the month and year you want to view (e.g., "2026/02" for February 2026).
Attendance Table
2Attendance Data
The table displays the following columns:
- NO: Sequential number
- IMAGE: Expert profile picture
- NAME: Expert name
- MONTH YEAR: Selected month and year
- AVAILABLE DAYS: Number of days the expert was available
- ABSENT DAYS: Number of days the expert was absent
- TOTAL DAYS: Total working days in the month
Orders
The Orders section allows you to view and manage all e-commerce orders placed through your salon's online store.

Order Filtering
1Filter by Order Type
Use the "Order type" dropdown to filter orders:
- "All": View all orders
- Specific order types (pending, completed, cancelled, etc.)
Orders Table
2Order Information
When orders are available, the table displays:
- No: Sequential number
- Order Id: Unique order identifier
- User Info: Customer details
- Items: Products ordered
- Price: Order total
- Shipping Charge: Shipping cost
- Status: Order status (pending, processing, shipped, delivered, etc.)
- Edit: Action to modify order details
Services
The Services section allows you to manage your salon's service catalog, including selecting from admin services, editing existing services, and removing services.
Two-Panel Layout
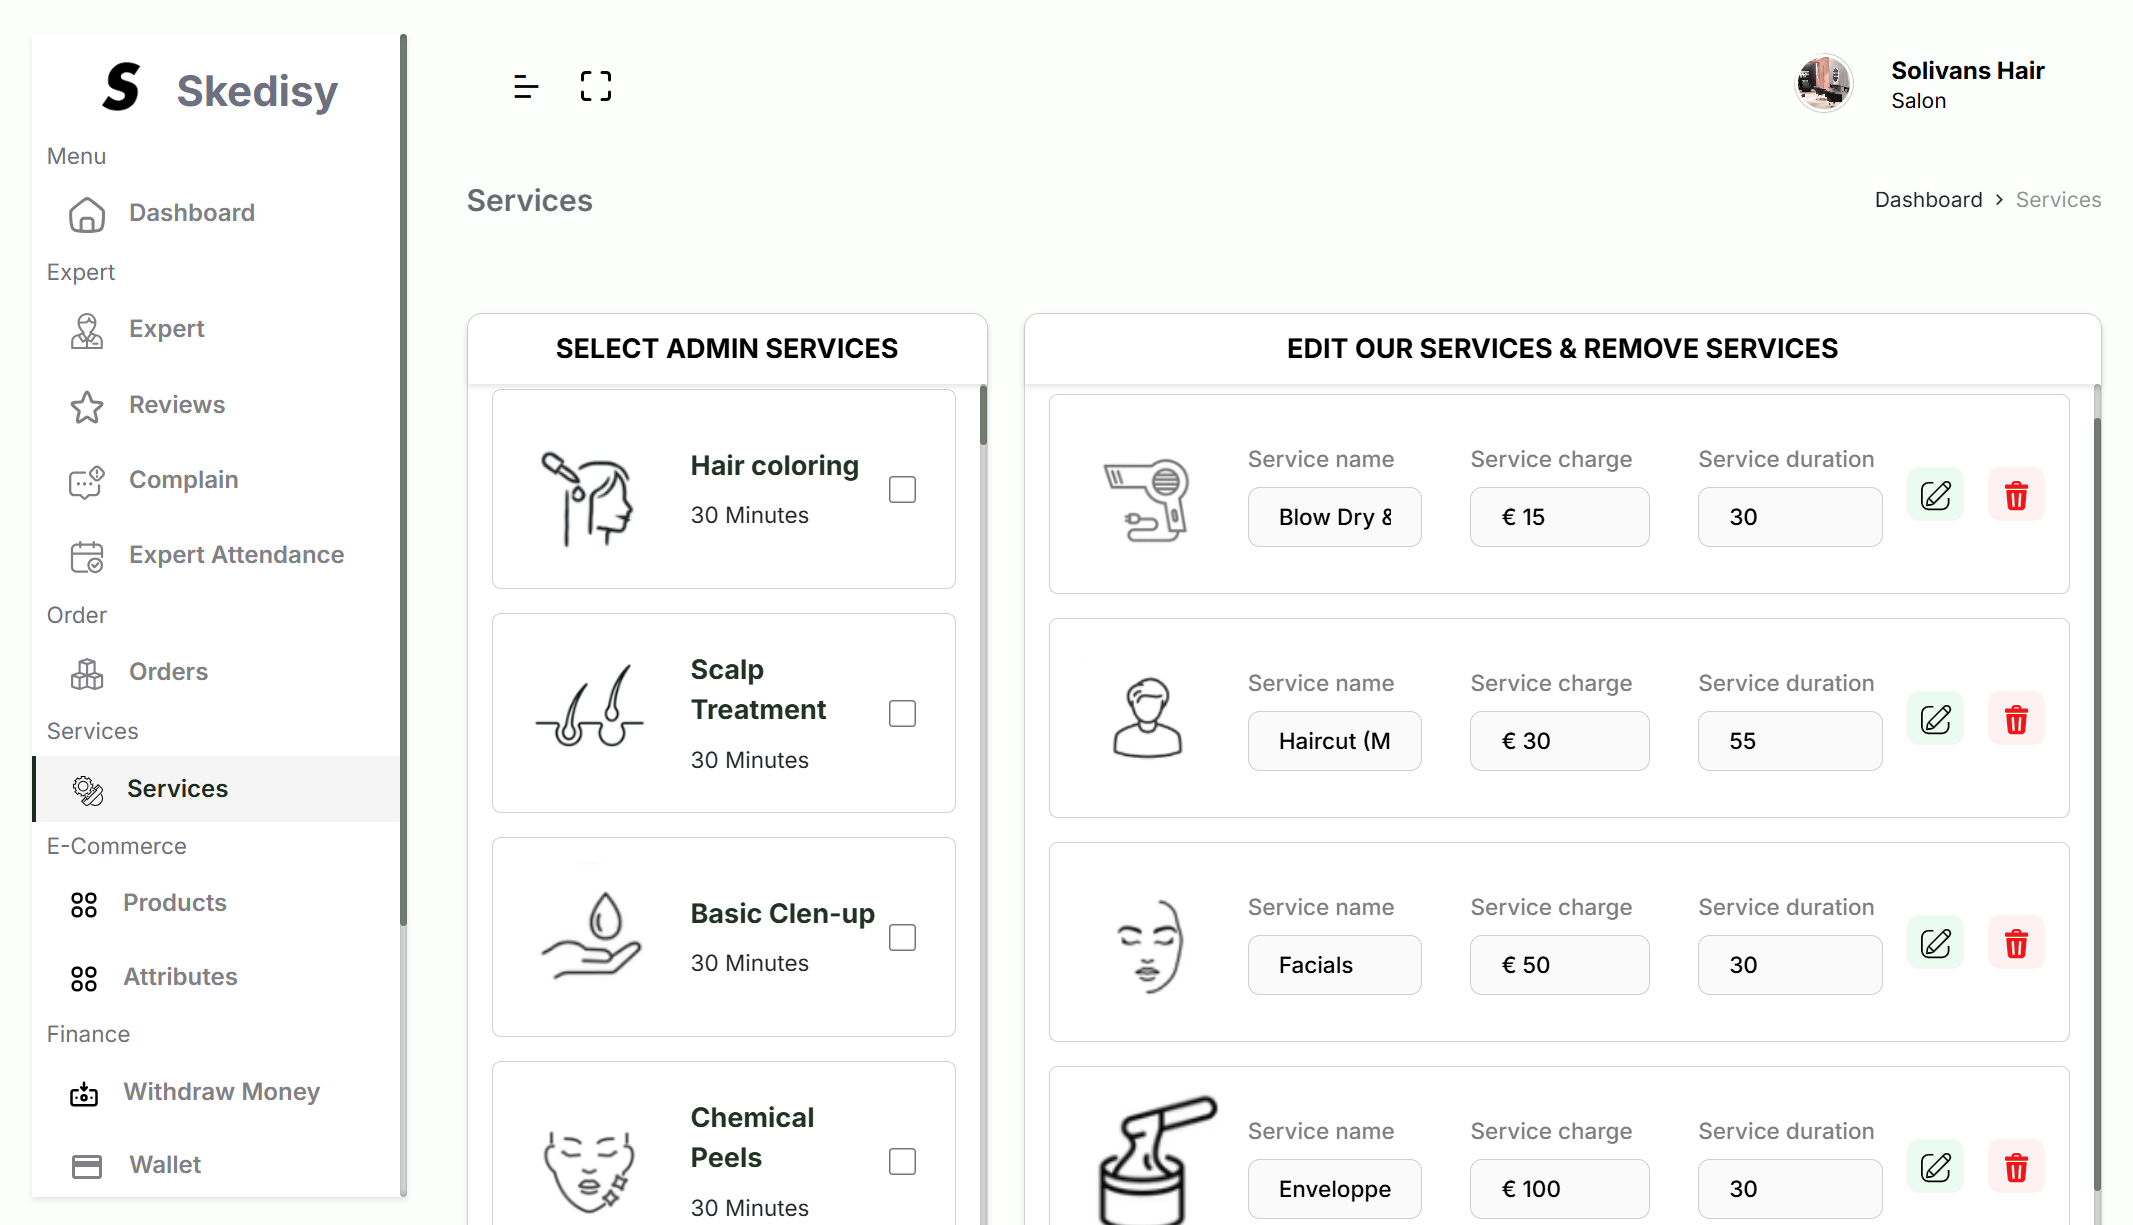
1SELECT ADMIN SERVICES (Left Panel)
The left panel displays available services from the admin catalog:
- Each service shows an icon, name, and duration
- Checkboxes allow you to select services to add
- Examples: "Hair coloring", "Scalp Treatment", "Basic Clen-up", "Chemical Peels"
- Scroll to see more available services
2EDIT OUR SERVICES & REMOVE SERVICES (Right Panel)
The right panel shows your current salon services with editable fields:
- Service Icon: Visual representation
- Service Name: Editable text field (e.g., "Blow Dry &", "Haircut (M", "Facials")
- Service Charge: Editable price field with currency symbol (e.g., "€ 15", "€ 30", "€ 50")
- Service Duration: Editable duration in minutes (e.g., "30", "55")
- Edit Button: Green pencil icon to save changes
- Delete Button: Red trash icon to remove service
Managing Services
3Adding Services
To add a new service:
- Browse the left panel for available services
- Check the box next to the service you want to add
- The service will be added to your catalog
4Editing Services
To modify an existing service:
- Find the service in the right panel
- Edit the name, charge, or duration fields
- Click the green Edit (pencil) icon to save changes
5Removing Services
To remove a service:
- Find the service in the right panel
- Click the red Delete (trash) icon
- Confirm the deletion
Products
The Products section allows you to manage your e-commerce product catalog, including adding products, setting prices, managing inventory, and controlling product availability.
Adding Products
1Create New Product
Click the "+ Add Products" button to:
- Create a new product entry
- Upload product images
- Set product details (name, brand, category, price, etc.)
- Configure shipping and availability
Products Table
2Product Information
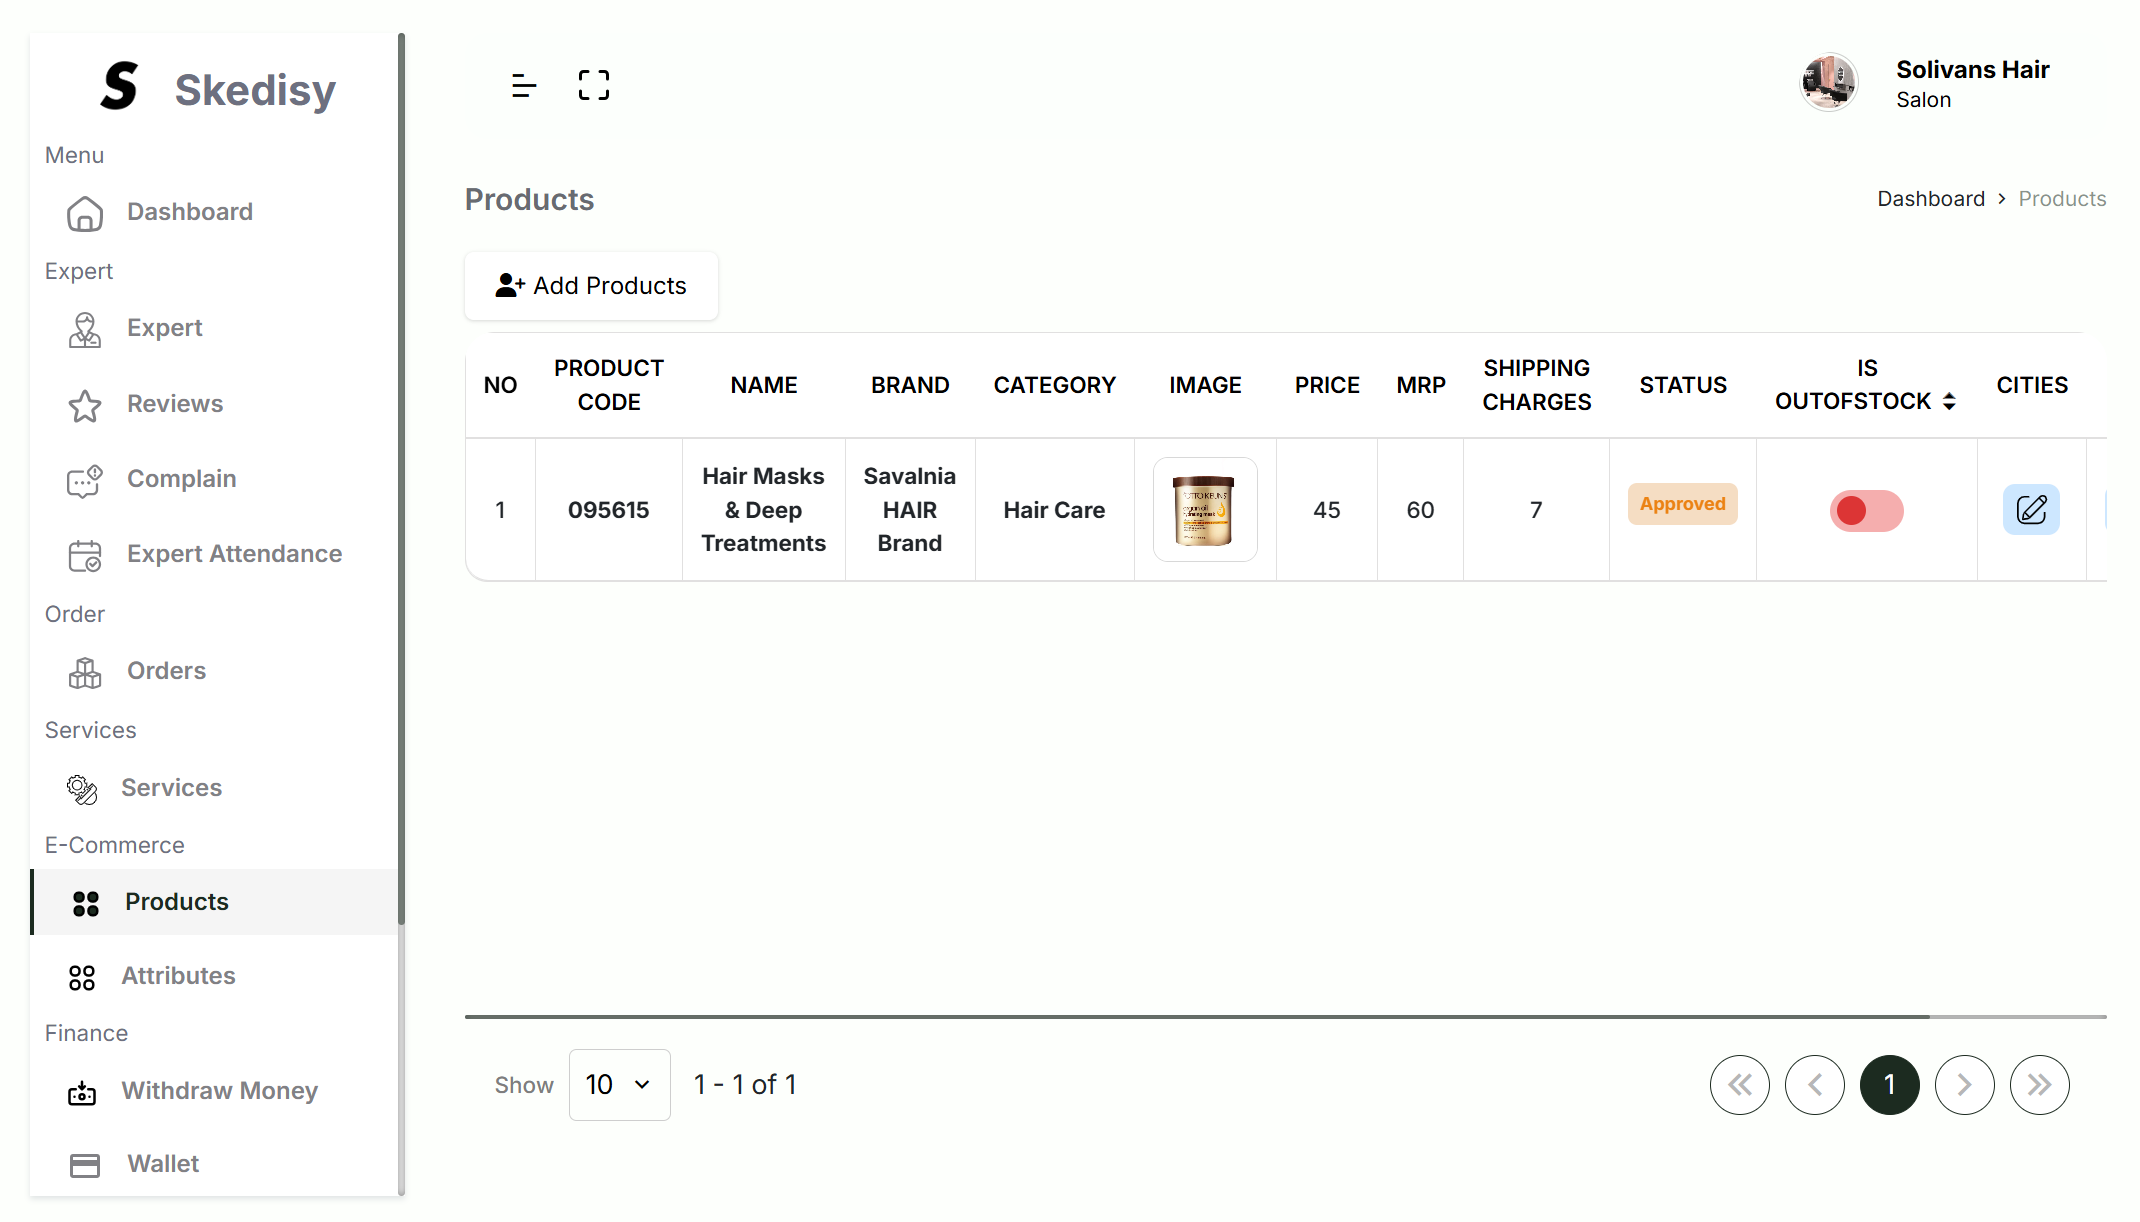
The table displays comprehensive product details:
- NO: Sequential number
- PRODUCT CODE: Unique product identifier (e.g., "095615")
- NAME: Product name (e.g., "Hair Masks & Deep Treatments")
- BRAND: Brand name (e.g., "Savalnia HAIR Brand")
- CATEGORY: Product category (e.g., "Hair Care")
- IMAGE: Product thumbnail
- PRICE: Selling price (e.g., "45")
- MRP: Maximum Retail Price (e.g., "60")
- SHIPPING CHARGES: Shipping cost (e.g., "7")
- STATUS: Approval status (e.g., "Approved" in orange)
- IS OUTOFSTOCK: Toggle switch (red = out of stock, green = in stock)
- CITIES: Edit button to manage city availability
Managing Products
3Product Actions
For each product, you can:
- Edit Details: Modify product information
- Toggle Stock: Mark products as in stock or out of stock
- Manage Cities: Control which cities the product is available in
- View Status: Check approval status
Attributes
The Attributes section allows you to manage product attributes, which are used to categorize and filter products in your e-commerce store.

Adding Attributes
1Create New Attribute
Click the "+ Add Attribute" button to:
- Create a new product attribute
- Set attribute name
- Add attribute details/description
Attributes Table
2Attribute Information
The table structure includes:
- NO: Sequential number
- NAME: Attribute name
- DETAILS: Attribute description
- CREATED AT: Creation date
- ACTION: Edit or delete options
Salon Time
The Salon Time section allows you to manage your salon's operating hours and break times for each day of the week.

Operating Hours Table
1Weekly Schedule
The table displays your salon's schedule for each day with the following columns:
- NO: Day number (1-7)
- DAY: Day of the week (Monday through Sunday)
- OPEN TIME: Salon opening time (e.g., "09:00 AM")
- CLOSE TIME: Salon closing time (e.g., "10:00 PM", "09:00 PM")
- SALON BREAK START TIME: Break start time (e.g., "01:30 PM" or "-" if no break)
- SALON BREAK END TIME: Break end time (e.g., "02:30 PM" or "-" if no break)
- EDIT: Blue pencil icon to modify the schedule
Editing Schedule
2Modifying Hours
To change operating hours or break times:
- Click the Edit (pencil) icon for the desired day
- Update the opening time, closing time, or break times
- Save your changes
3Break Times
Break times are optional:
- If no break is needed, the break time columns show "-"
- Set break times for days when you need a lunch break or maintenance period
- During break times, no bookings will be available
Salon Holiday
The Salon Holiday section allows you to manage holidays and special dates when your salon will be closed.

Holiday Management
1Adding Holidays
Click the "+ New holiday" button to:
- Add a new holiday date
- Set the reason for closure
- Block bookings for that date
Holidays Table
2Holiday Information
The table displays:
- NO: Sequential number
- DATE: Holiday date (e.g., "2026-01-27")
- REASON: Reason for closure (e.g., "Out Of The Office")
Filtering
3View Options
Use the "ALL" filter button to:
- View all holidays
- Filter by specific criteria (if additional filters are available)
Wallet
The Wallet section allows you to view your current balance, recharge your wallet, and understand minimum balance requirements for accepting bookings.
Wallet Balance
1Current Balance
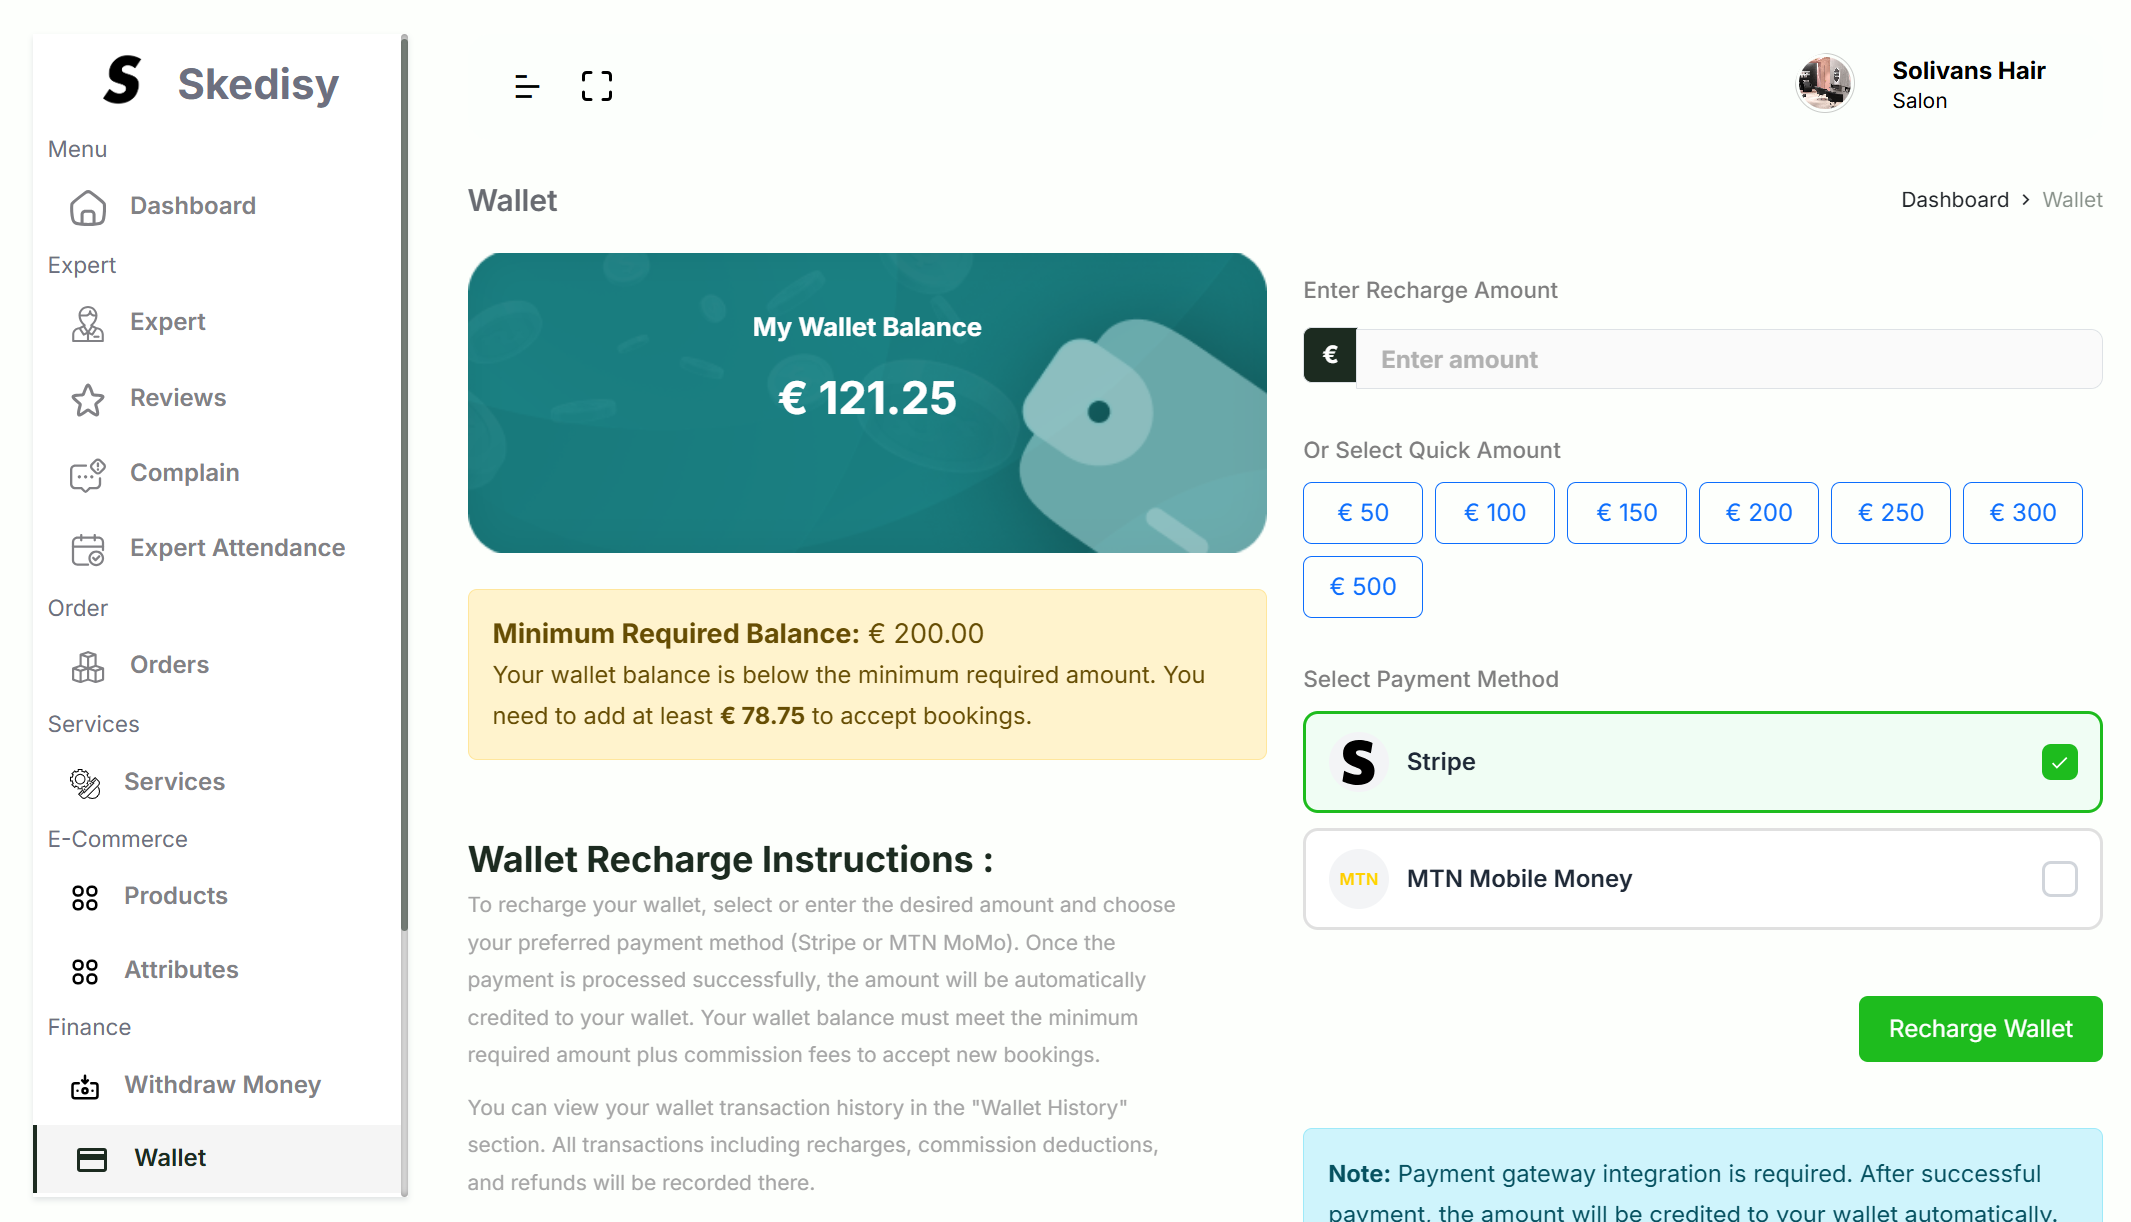
The teal balance card displays:
- "My Wallet Balance": Label at the top
- Balance Amount: Current balance in large, bold text (e.g., "€ 121.25")
- Visual Icon: Wallet or money symbol graphic
Minimum Balance Requirement
2Balance Alert
A yellow alert box shows:
- Minimum Required Balance: Amount needed (e.g., "€ 200.00")
- Shortfall Message: How much you need to add (e.g., "You need to add at least € 78.75")
- Purpose: "to accept bookings" - explains why the minimum is required
Recharge Options
3Enter Amount
Use the "Enter Recharge Amount" field to:
- Type a custom amount
- Use the "€" button for currency formatting
4Quick Amount Selection
Click predefined amount buttons for quick recharge:
- € 50, € 100, € 150, € 200, € 250, € 300, € 500
- Buttons are highlighted when selected
Payment Methods
5Select Payment Method
Choose your preferred payment method:
- Stripe: Credit/debit card payments (green border, checkmark when selected)
- MTN Mobile Money: Mobile money payments (grey border, checkbox when selected)
Recharge Process
6Completing Recharge
To recharge your wallet:
- Enter or select the recharge amount
- Choose your payment method
- Click "Recharge Wallet" button
- Complete the payment process
- Balance will be updated automatically after successful payment
Wallet Instructions
The page includes detailed instructions explaining:
- How to recharge your wallet
- Payment method options (Stripe or MTN MoMo)
- Automatic credit after successful payment
- Minimum balance requirement for accepting bookings
- Commission fee considerations
- How to view transaction history
Wallet History
The Wallet History section provides a detailed transaction log of all wallet activities, including recharges, commissions, and other financial transactions.
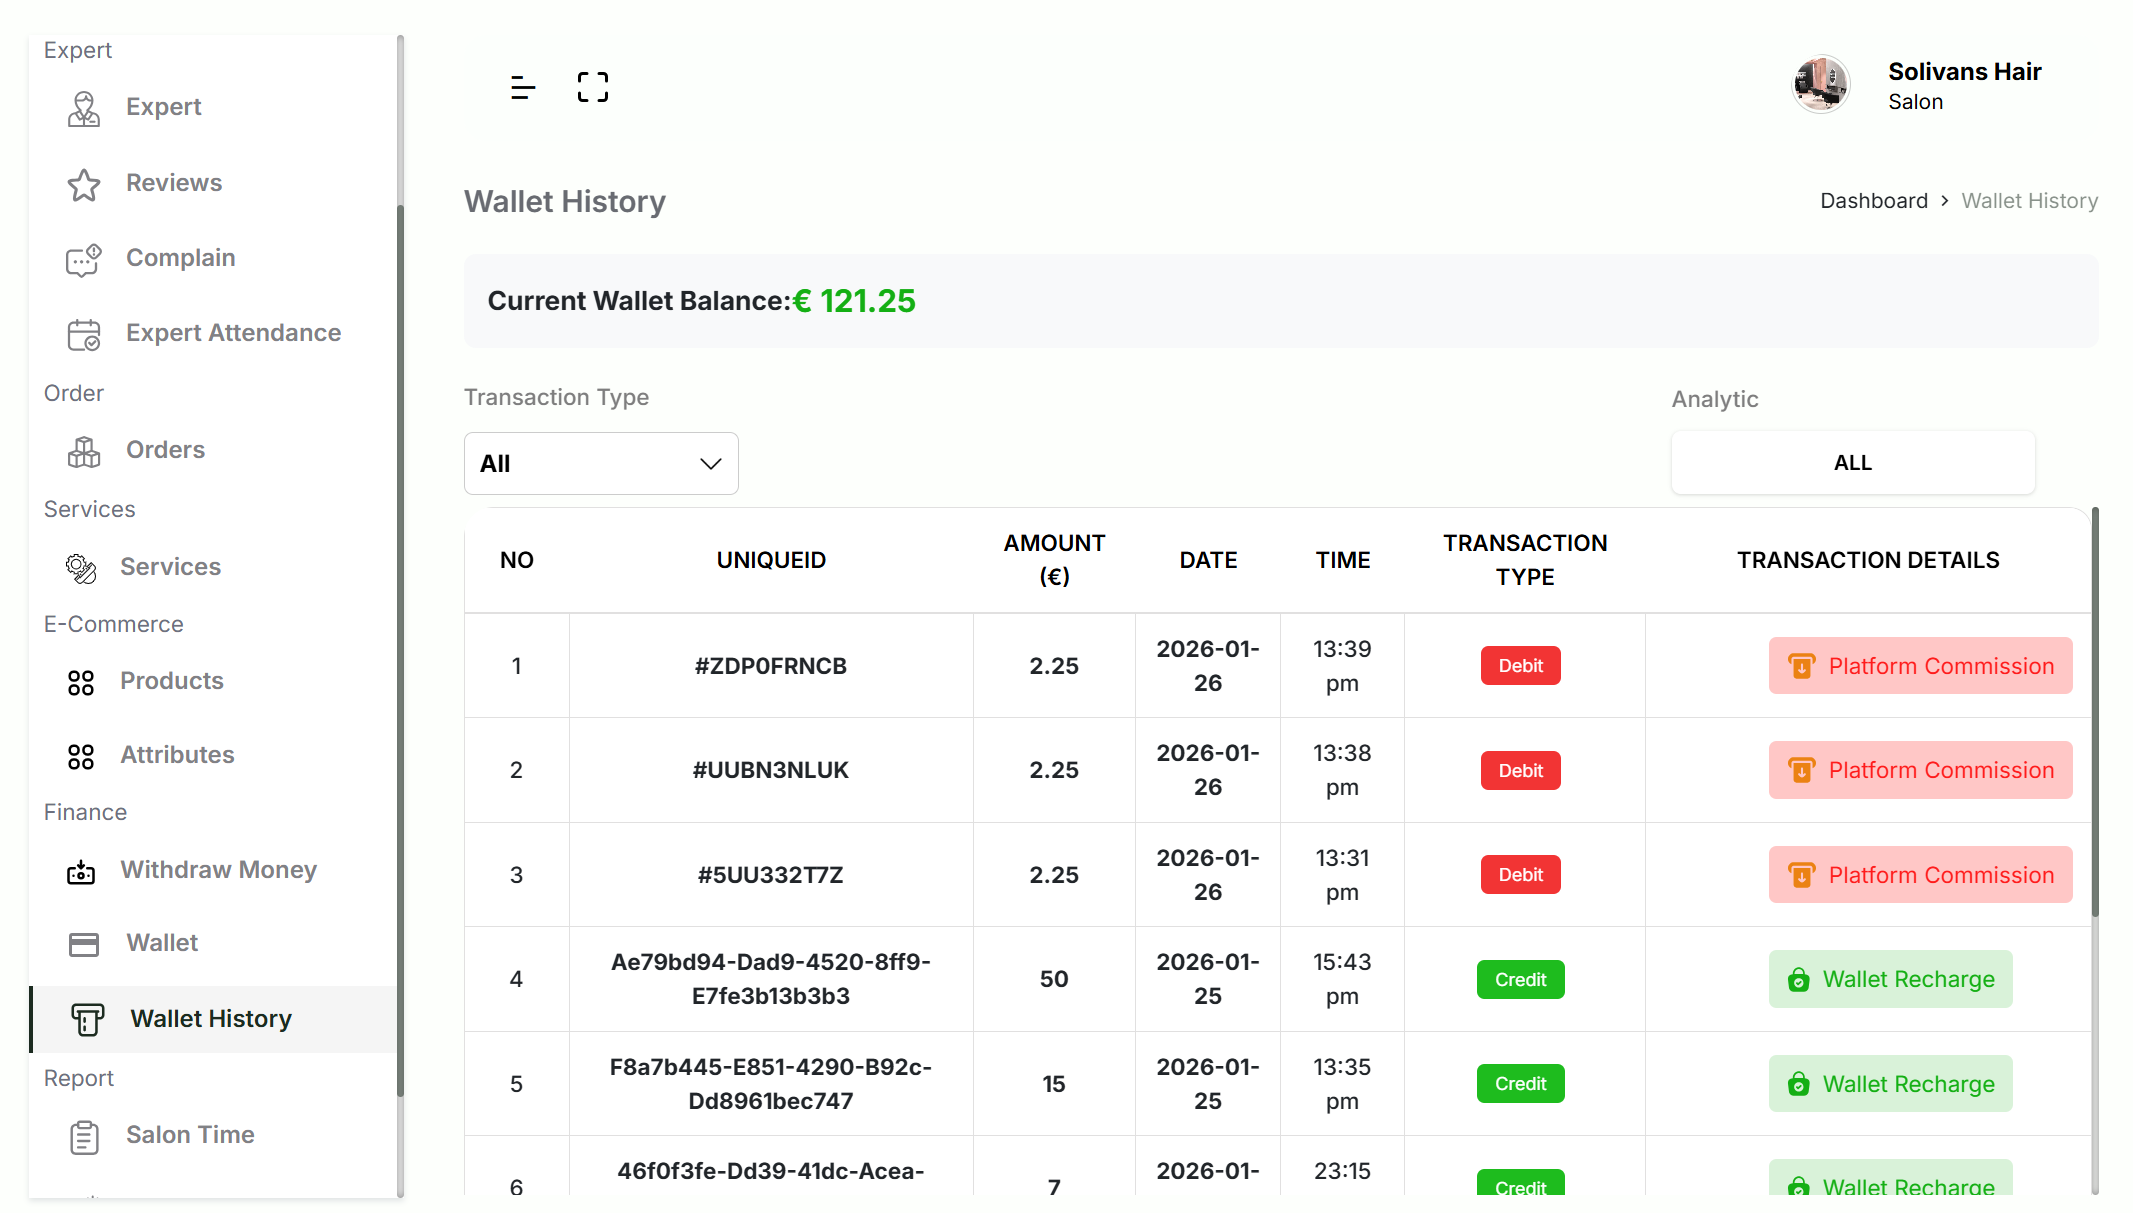
Current Balance
1Balance Display
The top of the page shows:
- "Current Wallet Balance:" Label
- Balance Amount: Highlighted in green (e.g., "€ 121.25")
Filtering Transactions
2Transaction Type Filter
Use the "Transaction Type" dropdown to filter:
- "All": View all transactions
- "Debit": View only deductions (commissions, fees)
- "Credit": View only additions (recharges, refunds)
Transactions Table
3Transaction Details
Each transaction displays:
- NO: Sequential number
- UNIQUEID: Unique transaction identifier (e.g., "#ZDPOFRNCB", "Ae79bd94-Dad9-4520-8ff9-E7fe3b13b3b3")
- AMOUNT (€): Transaction amount
- DATE: Transaction date (e.g., "2026-01-26", "2026-01-25")
- TIME: Transaction time (e.g., "13:39 pm", "15:43 pm")
- TRANSACTION TYPE: Color-coded button:
- Red "Debit": Money deducted (commissions, fees)
- Green "Credit": Money added (recharges, refunds)
- TRANSACTION DETAILS: Description with icon:
- Red button with up arrow: "Platform Commission"
- Green button with padlock: "Wallet Recharge"
Understanding Transactions
4Transaction Types
Debit Transactions:
- Platform commissions deducted from bookings
- Service fees
- Other deductions
Credit Transactions:
- Wallet recharges via Stripe or MTN MoMo
- Refunds
- Adjustments
Withdraw Money
The Withdraw Money section allows you to transfer funds from your wallet to your registered payment account.
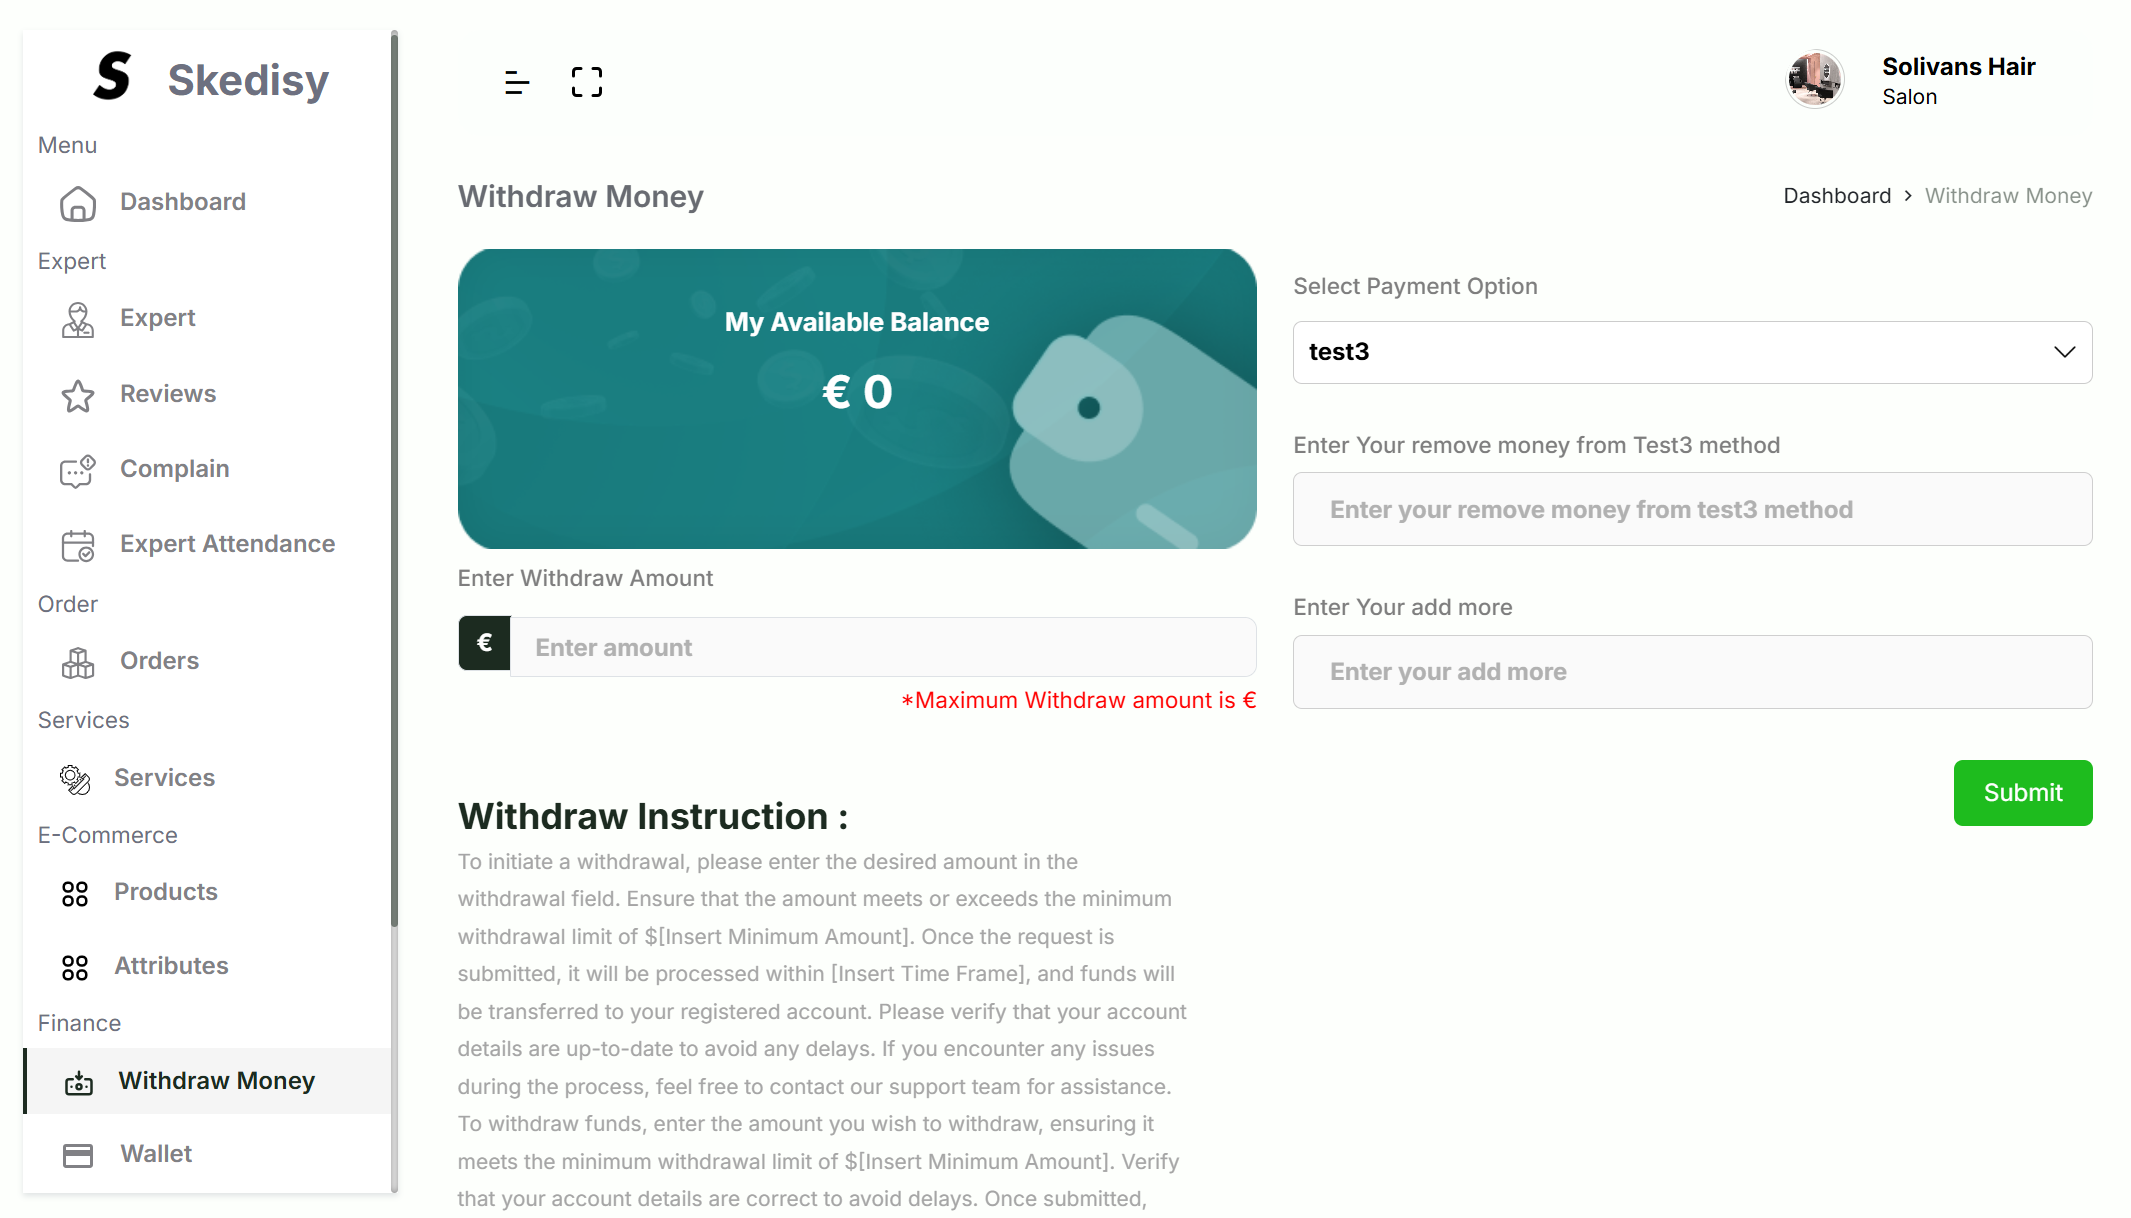
Available Balance
1Balance Card
The teal balance card displays:
- "My Available Balance": Label
- Balance Amount: Current withdrawable balance in large, bold white text (e.g., "€ 0")
- Visual Elements: Stylized currency symbols or coins
Withdrawal Form
2Payment Option
Select your withdrawal method using the "Select Payment Option" dropdown (e.g., "test3" or your registered payment method).
3Payment Details
Enter payment information:
- "Enter Your remove money from [Method] method": Account details or payment identifier
- This field varies based on your selected payment method
4Withdrawal Amount
Enter the amount you want to withdraw:
- Use the "Enter Withdraw Amount" field
- Click the "€" button for currency formatting
- Note the maximum withdrawal amount limit shown in red text below the field
5Additional Information
The "Enter Your add more" field allows you to:
- Add notes or additional information
- Provide special instructions
- Include reference numbers if needed
Submitting Withdrawal
6Complete Withdrawal
To withdraw funds:
- Select your payment option
- Enter payment method details
- Enter the withdrawal amount
- Add any additional information if needed
- Click the green "Submit" button
- Wait for processing confirmation
Withdrawal Instructions
The page includes detailed instructions covering:
- Minimum withdrawal amount requirements
- Processing timeframes
- Fund transfer process
- Account verification requirements
- Support contact information
This documentation is continuously updated. For the latest features and updates, please check back regularly or contact our support team.